Today it’s time for my review of the new Sally Hansen 18K Gold Hardener. As I have previously mentioned I usually don’t use nail strengtheners cos they make my nails too hard and they start to peel and chip easier. How ever Sally Hansen Nail Rehab base coat worked so well for me that I wanted to give this one a try too.

Category: Sally Hansen
Sally Hansen Luxe Lace – Eyelet and Ruffle

Today I have another two Sally Hansen polishes to show you. These are white 830 Eyelet and black 840 Ruffle from the Luxe Lace Spring 2015 collection.
Both of these are one color matte hex glitter in different sizes on a clear base. Formula was good and easy to apply. There was no need to fish for the glitter and two coats gave enough coverage. I wanted to play along with the lace theme and used a nude base for these but of course you can layer these with any color you want.
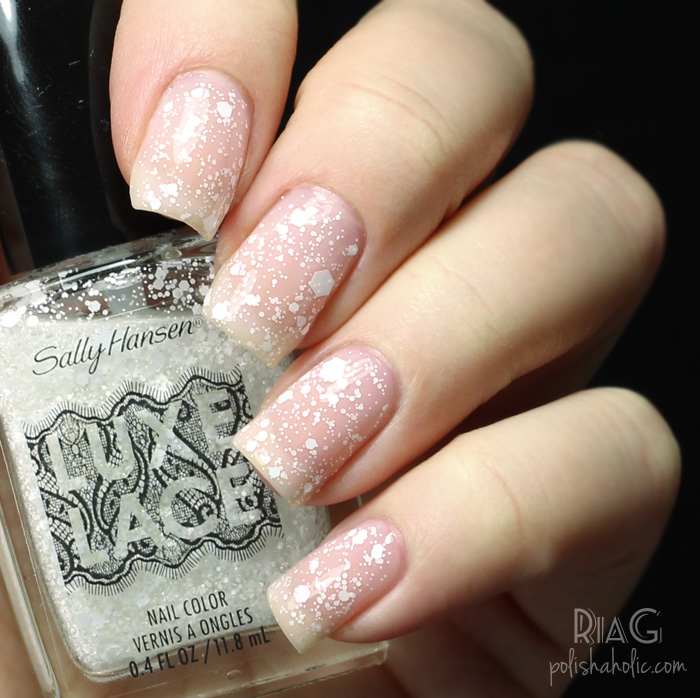

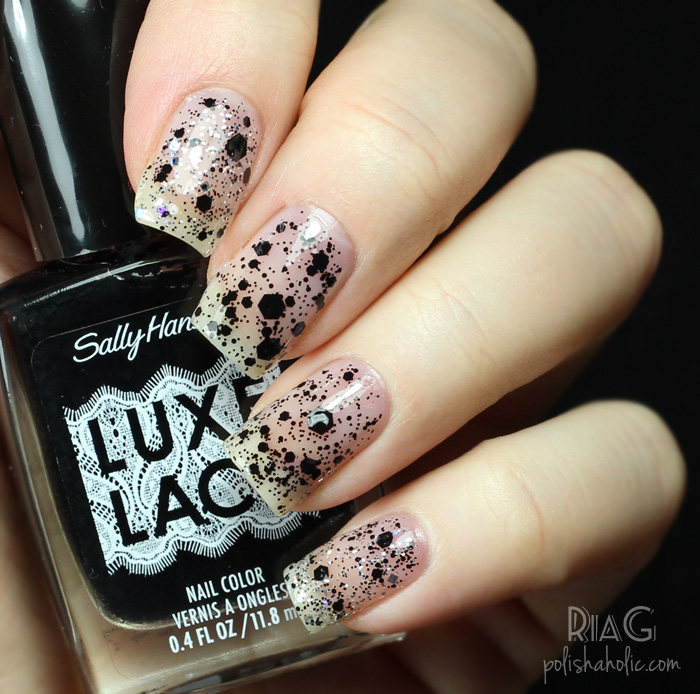

These are simple and very usable glitters. I love the fact that they are matte and just one color and shape. I have quite a few black & white glitters but none in just black or white that are this basic and trust me, sometimes basic is good. If you want to add something more you can always use another glitter together with these or apply these over a gradient base. You can also apply a coat of each if you don’t have and b&w glitter. There’s a lot of different ways to use these!
Both of the polishes have a coat of Essie Beam Up and a coat of Essie Sugar Daddy as a base. Then two coats of glitter and a coat of HK Girl.
With the black Ruffle I also added a coat of OPI In True Stefani Fashion before the black glitter to show how it works with a little added sparkle.
***These polishes were sent for review.
Sally Hansen Velvet Texture – Crushed and Lush
Matte polishes have made a big comeback and Sally Hansen also released a collection of matte polishes. I got two shades, 610 Crushed and 630 Lush to test.

These are actually a little different than your usual matte polish. Like the name suggests these dry almost textured, concrete looking and very matte. I quite like the effect. Application was surprisingly easy. No balding or streaks. I applied two coats of Crushed but would’ve got away with just one. With Lush I was smarter and only applied one coat. Dry time for two coats wasn’t impossible and it was very quick for just one coat over Glisten & Glow Stuck On Blu! base coat.


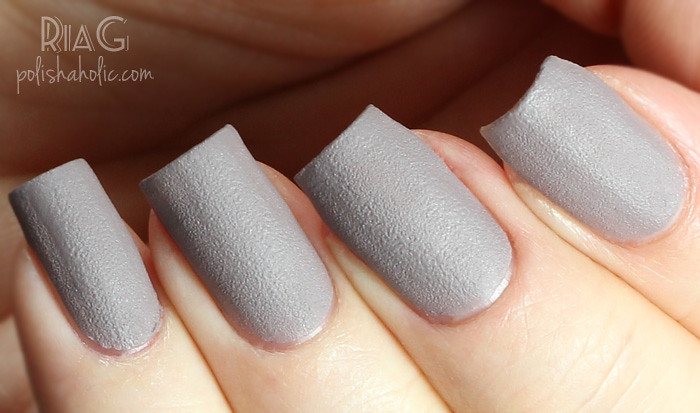
Since these were highly pigmented and very well behaving I decided to try if they’d work for stamping too and yes they did. Since these are fast drying mattes you have to be fast but other than that they worked great. Here’s stamping design I did using a squishy XL stamper and Dream Girl 16 stamping plate.

***These polishes were sent for review.
Sally Hansen Nail Rehab nail treatment
Since I grew out the gel nails I needed to start looking for good base coats and treatments for my natural nails. I also got an opportunity to test Sally Hansen Nail Rehab treatment. Usually nail strengtheners are not good for me and instead of making my nails stronger they make them break and peel.
Nail Rehab bottle does have the word “Strengthener” on it but I still decided to give it a try and I’m glad I did. Usually if something doesn’t work for my nails they start peeling and looking dry very fast. That happened with Duri Rejuvacote just after the third time I used it. I have now used over half a bottle of Nail Rehab and there is no peeling or any other problems at all.
To make sure it was a good product for me I only used Nail Rehab on my manicures for almost two months. On top of it I apply a coat of Glisten & Glow Stuck On Blu! base coat before the polish and top coat. Between manicures I use Bliss Kiss nail oil to hydrate my nails before applying the treatment again. I only keep my nails without polish on them for an hour max at the moment since I have to wash my hands all the time cos of the new baby.
Nail Rehab has a thick-ish formula and it also smooths out your nails like a ridge filler. On the photo below I still have a gel layover on part of my nails and two coats of Nail Rehab hides the growth line almost perfectly. The color is also just lovely natural looking peachy shade. It hides possible stains on your nails when you apply two coats of it. If you have a busy day you can just apply two coats of Nail Rehab and have perfect looking nude nails.
While using Nail Rehab my manicures have stayed good at least for 2 to 3 days without chipping. I could probably go for a few days longer but I get tired of looking at the same polish ;)

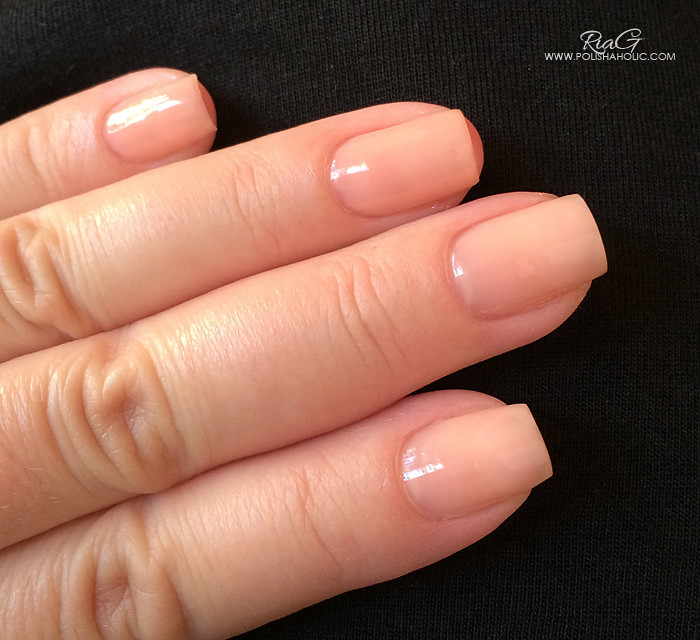
So all in all this treatment works perfectly for my nails. Doesn’t make them peel or dry. Makes a good base for a manicure and doesn’t cause the polish to chip faster than usual. I can’t say if this makes my nails stronger but it doesn’t cause peeling or drying for my nails like so many other base coats and treatments do and that’s enough for me.
Only thing I’d change about this is the brush. The bristles are really short and stiff. It took some time to get used to it but after a while I didn’t have issues with the application and the brush anymore.
If you’re looking for an affordable treatment for your nails I recommend you give this one a try too. Works great for me!
***This was sent for review.
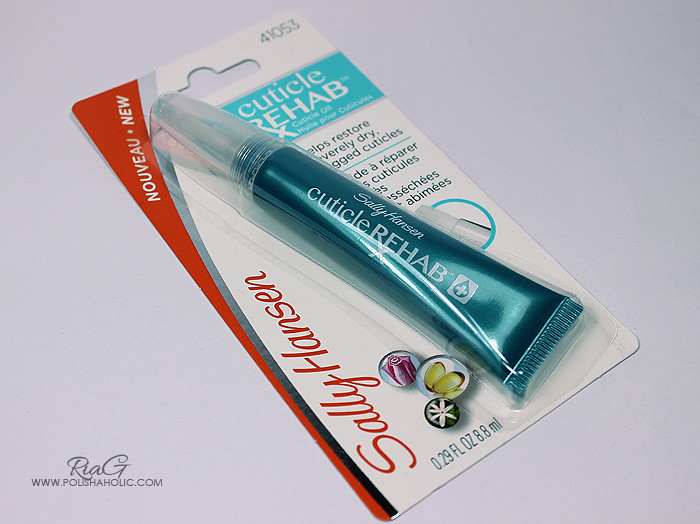
Sally Hansen Cuticle Rehab
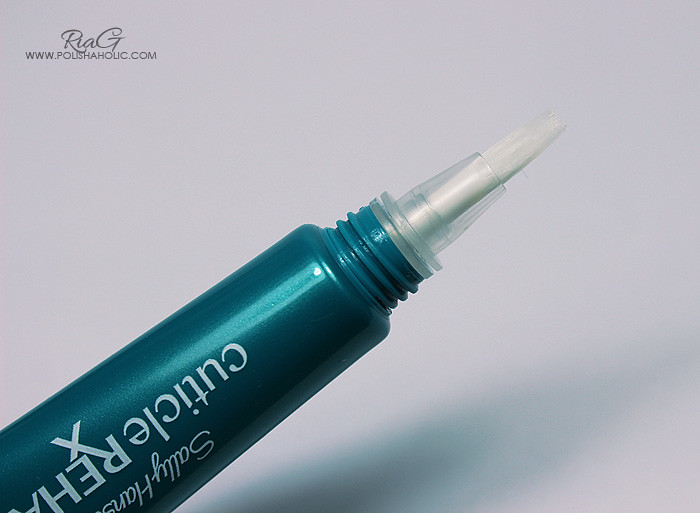
Happy Saturday lovelies! Instead of nail polish I have Sally Hansen Cuticle Rehab cuticle oil to talk about today. This is not your typical cuticle oil. Cuticle Rehab comes in a tube with a brush and has gel like formula. I have been testing this for a while now and I absolutely love it!
This is perfect for daily use to keep your cuticles pretty all day long. Small tube is easy to carry in your purse/makeup pouch. With the gel formula and the tightly closing cap there’s pretty much no risk of this leaking into your purse ruining everything in it. There’s no knocking the bottle over and having oil go all over your desk or clothes. Very easy and safe to use when ever your cuticles need a little love and care to look beautiful and well moisturized.
Application process is quick, easy and mess free. Just squeeze the tube lightly to get some gel in to the brush and then apply it to your cuticles, rub the product in and you’re good to go. This moisturizes your cuticles instantly but doesn’t leave them sticky or oily. Even if you massage the product into your nails and cuticles it doesn’t leave your fingers oily either. The scent is just lovely too, fresh and “green”, not too overpowering.
I use this at least couple of times during the day or when ever needed. I still use thick cuticle cream at nights but this has been a perfect addition to my cuticle care needs. I have young kids and I’m constantly washing my hands. I hate it when my cuticles look dry by noon and this product offers a significant help keeping my hands pretty. I can just apply it and move on! No need to wait for it to dry or wipe excess oil off my fingers.
If you have dry cuticles problem and you find oils too messy to use during the day I highly recommend you give this product a try. I know I love it!
***Sally Hansen Cuticle Rehab was sent for review.
Sally Hansen Satin Glam – 05 Chic Pink
Today I have a beautiful Sally Hansen Satin Glam polish for you, Chic Pink. This color is right down my alley and perfect for spring and summer. I chose to wear it without a top coat as it’s meant to be used cos I love the satin finish. If you’re not a fan you can always use a top coat to bring on the shine.
Formula was good and two coats was enough for an opaque result on my gel nails. Dry time was a little long for a fast drying top coat addict like me but still tolerable. This peachy pink polish will definitely be seen on my nails again! Love it!

***This was sent for review
Sally Hansen Fuzzy Coat – Fuzz-Sea
It’s December and it’s time for all the Holiday manicures and posts but first let me get this Sally Hansen Fuzzy Coat manicure out of the way. This is two coat of Fuzz-Sea dabbed on to Color Club Poetic Hues finished with a coat of HK Girl top coat. This would’ve looked a lot better if I used a tape to help make a crisp line instead of freehanding it. I love the colors though and I’ll most certainly dig Fuzz-Sea out of my polish drawer when spring gets here again.


***Fuzz-Sea and Poetic Hues were sent for review. HK Girl was purchased by me.
Sally Hansen Fuzzy Coat – 800 Tweedie
Here’s a tape manicure done using Sally Hansen Fuzzy Coat 800 Tweedie and Color Club Silver Lake with G & G HK Girl top coat. I quite like how this turned out. Tweedie creates a cool effect with tape and the light grey base color. I’m not the biggest fan of bar glitter but I’m loving this one. I have two more shades to try out and now I’m trying to figure out something cool to do with them too :)


***Tweedie was sent for review, Silver Lake was gifted to me and HK Girl was purchased by me. I don’t benefit from clicking the links on this post.
Sally Hansen Hard As Nails Xtreme Wear – Plum Power
Here’s the next polish I got from my trip, Sally Hansen Hard As Nails Xtreme Wear shade Plum Power. Not a very unique color but still very beautiful. This was good for my collection cos I didn’t have a similar polish yet. This purple shade is another great color for fall and it really does look plum-y.
Plum Power’s application wasn’t the best possible but it’s well pigmented. Two coats was quite enough. The negative thing I have to say is that this took forever to dry, even with Poshe. On the positive side, this seems to be well lasting. Three days and no chipping and the shine stays on. Average polish with a very reasonable price tag and it really is a pretty shade.
In this mani I used: OPI NNS x2, Plum Power x2 and Poshe on top.

Sally Hansen Lacquer Shine Nail Color – Glow
Once again, green :D Sally Hansen Lacquer Shine shade Glow lives up to it’s name. This one truly glows! Amazingly beautiful light green polish with a lot of gold shimmer. Pretty, pretty, pretty!! This also stayed on my nails without chipping.
Glow is thin and quite well pigmented. Two coats was enough for my nails. SH Lacquer Shine polishes have a thin and long brush but even with that this polish was easy to apply.
In this mani I used: OPI Nail Envy Soft & Thin x1, Glow x2 and Seche Vite.
