Category: Nails

Jindie Nails – Barney Blew Up

10

Surprise, surprise it’s indie glitter polish time again! Lately I’ve gone head over heels crazy over indie brands and especially glitter polishes. I hope you like to see these as much as I do :)

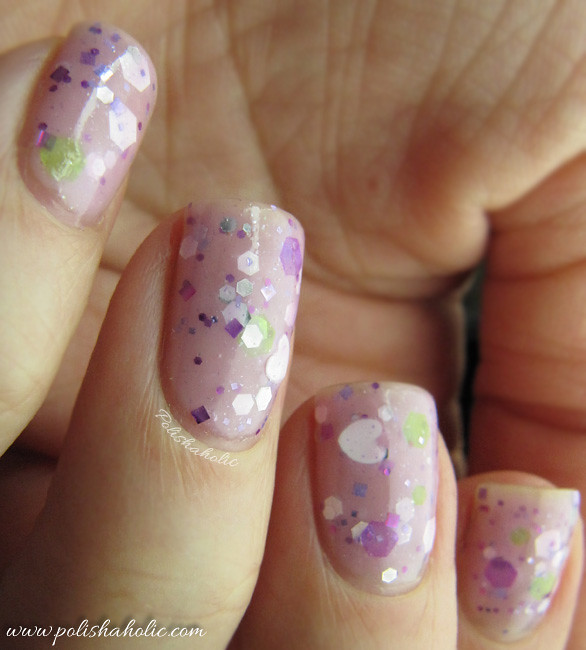
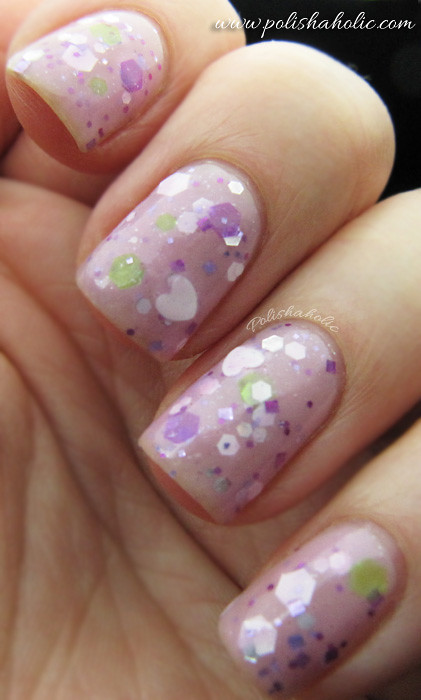
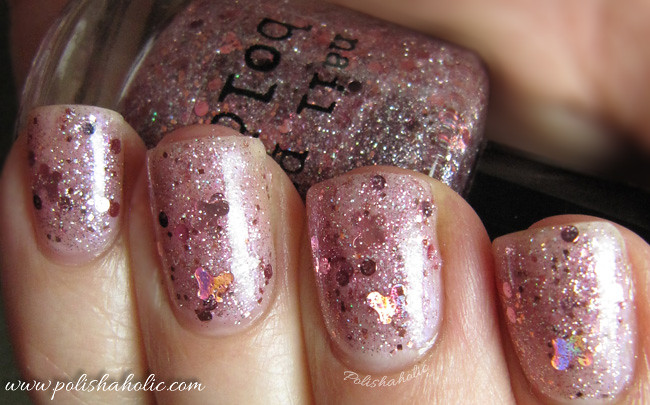
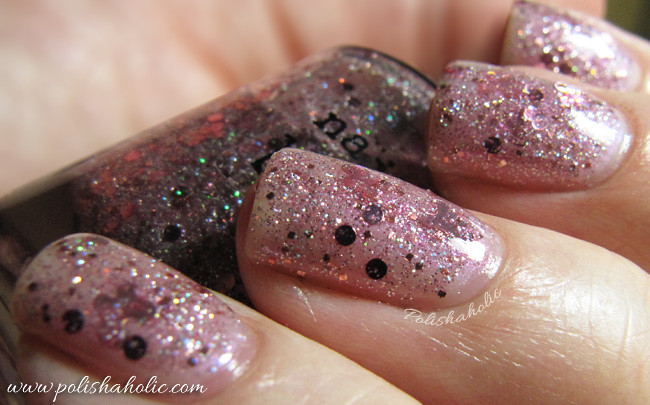
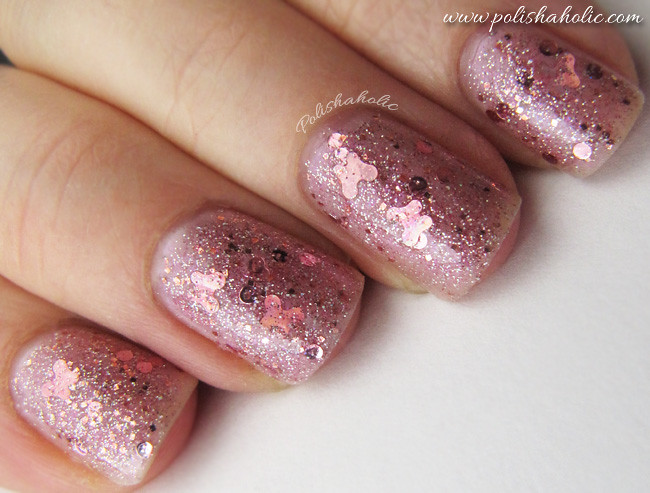
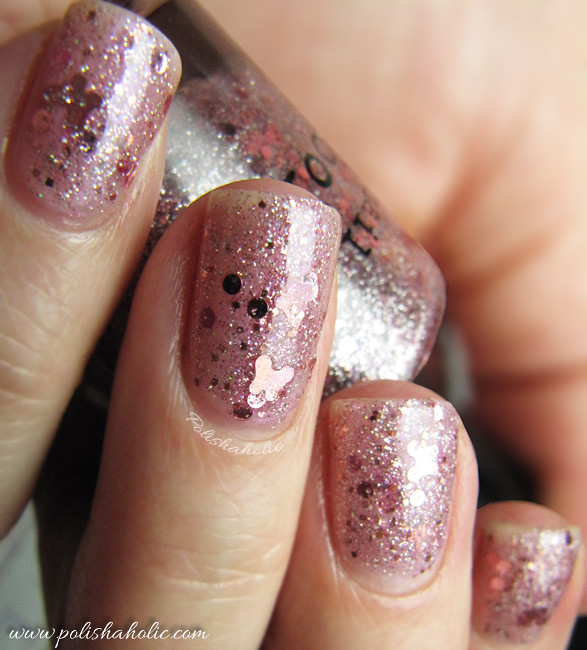
This amazing glitter overdose polish is Jindie Nails Barney Blew Up. Just the name was so cute and appropriate that I just had to have this and it is unlike anything else in my collection. Very pale lilac crelly base has a ton of different kinds of glitter pieces. There’s squares, hex glitter, bigger hex glitter, hearts and what not. It’s a wonderful, cute and spring-y glitter explosion on your nails. It might be the green hex glitter that makes me think of spring.

This is your typical indie glitter, a bit on the thick side but not impossible at all to apply. I started by applying one normal coat of Barney Blew Up on top of my base coat and let it dry for a bit. I turned the bottle upside down while waiting so it would be easier to fish out the bigger glitter pieces. After the first coat had dried for a bit I went hunting for the bigger hex pieces and the hearts. I placed those on my nails and added a coat of Nail Pattern Boldness Glitter Food and Inm Out The Door top coat.

Jindie nails is quite a popular brand and you can purchase their polishes from their Etsy-store (which is sometimes closed) as well as Llarowe, Mei Mei’s Signatures and Ninja Polish. You can find the latest restock and other info from their Facebook page.


BG Cosmetics – Chocolate Treasure

10

BG Cosmetics aka Bitch Glitz is a new indie brand that makes nail polish among other things. I saw swatch photos of Chocolate Treasure in several blogs and it looked so delicious that I just had to order it myself too. Chocolate Treasure is one of the three polishes from their Valentine’s collection. This one did not disappoint me IRL either. The shade is amazing chocolate brown and it makes me feel like I want to taste it :D The different color, size and shape glitters look great in this one and I especially like the bigger turquoise ones. The formula is a bit on the thick side but still very easy to apply. Two coats was enough for opaque result. The glitter came out of the bottle very easily and there was no need for fishing for it or keeping the bottle up side down first. This dries a little rough cos of all the glitter but just a coat of top coat helps a lot. I also used a coat of Nail Pattern Boldness Glitter Food with this. Dry time was normal with Inm Out The Door.

You can buy BG Cosmetics products from their store. BG Cosmetics also gives out this info about their nail polishes “All polishes are 3 Free and 15 ml bottles. They are all made with diamond dust for added chip resistance and longevity”. So click on the link and go check out their store!


ABC Challenge – E is for Editorial

40

It’s time for letter E this week and for that I chose Color Club Editorial. I didn’t have anything cool for E so I just took the easy way out ;) I actually bought something but it didn’t make it here in time :( Editorial is one of the eight thousand Chanel Peridot dupes out there. I can actually still find Peridot from the local stores here but I can’t justify paying almost 30 euros for the shade I kinda already have. So I’m sticking with Color Club’s much more affordable version instead.

Editorial is gold and green duochrome. For this I only applied one coat. The first time I tried it I got a lot of bubbles. It could’ve been the base coat though. This time I used one coat of Essie Nourish Me and had no issues. As you can see it looks a bit brushstroke-y on the photos but not so much IRL. This one is definitely worth getting if you’ve been thinking about getting Chanel Peridot but the price gets in the way and you don’t already own one of the dupes.

So this was my entry for the letter E.


KKCenterHk 1.5 mm nail art studs review

10

KKCenterHk sent me some 1.5 mm circular nail art studs for a review. These studs are quite tiny and I liked them a lot. They were very easy to place on the nail and cos of the curved bottom they didn’t damage the wet manicure at all. Instead they kinda sunk into it a little without leaving a mark or a wrinkle into the polish. They lay so flat on the nail that I couldn’t even pick them off with my nails (yes, I tried). I applied these on the not yet dry manicure and sealed them in with a top coat. These stuck on so tight they would have stayed on my nails for days and days but I only wore this for a day and a half.

In this mani I used three coats of Color Club Who Are You Wearing? and then used Color Club Reddy Or Not to do the heart with a dotting tool. I applied the studs on the wet manicure and slightly pressed them down on to the nail. I topped it off with a coat of Inm Out The Door.

These studs were very easily removed with acetone free nail polish remover. Actually so easily that they were all nice and clean on the cotton wool pad and I was able to pick them up for another use ;)

The bag holds about 50 pcs of studs and that is my only complaint. I liked these so much I’d like to get them in a bigger bag than 50 pcs. These are so tiny it’s easy to use a lot of them on a more complicated nail art design.

You can find these nail art studs from KKCenterHk and if you use the code “polishaholic” you’ll get -10% off.


***This was sent for a review


Nail Pattern Boldness – Is Someone Loving You?

6
I got this stunning glitter polish from Nail Pattern Boldness indie brand. Is Someone Loving You? is one of the four polishes from their brand new Valentine’s collection called Hello?. This polish has a lot of pink and holographic microglitter, bigger pink circle glitter, smaller square glitter and holographic butterflies (OMG!!!) on a clear base. This polish is STUNNING! So delicate and beautiful! I’m bummed out about my nails being so short at the moment. How gorgeous would this look on longer nails *deep sigh*

I also got their highly praised top coat Glitter Food. Many bloggers are totally in love with this top coat and for a good reason. I’m going to test this out with few more glitter polishes and then write my review of it with some example photos. I can already tell you it really works though. I tried it with this polish and only used it on my left hand nails with a coat of Inm Out The Door on top of everything. On the right hand I only used Inm Out The Door and the difference is noticeable. Left hand Glitter Food nails have much more depth in them, glitter is shinier and the surface is smooth. Right hand nails look flat, duller and you can feel the glitter through Inm alone. Using Glitter Food also didn’t make the dry time for the manicure any longer.

In this mani I used Essie Nourish Me x1, Essie Beam Me (whitening base coat) x1, Color Club Sugar Rush (sheer pink with a cold toned pink flash), Nail Pattern Boldness Glitter Food x1 and Inm Out The Door super fast dry top coat.

You can buy Nail Pattern Boldness polishes from their Etsy store. You should also “Like” their Facebook page to get the latest news and restock info. At the moment the Hello? collection is sold out but I believe there is going to be a restock next week. I’m sure the dates and time will be announced on their FB page.


***This was sent for a review.

Hare Polish – Midsummer’s Midnight

8

It’s time to continue my adventures in the wonderland that is indie polish. This time I have HARE Polish Midsummer’s Midnight for you. This is a glitter polish with multicolored, shaped and sized glitter on a dark sheer-ish base. This is totally awesome!! I especially fell in love with the square glitter in it. Yet another beautiful and unique addition to my polish collection.

In this manicure I used one coat of black Color Club Where’s The Soiree? and two coats of HARE Midsummer’s Midnight plus a coat of Inm Out The Door. I think you can get away with just three coats of Midsummer’s Midnight alone but I wanted to use black base to really make the glitter pop. This was easy and even to apply and glitter went on the nail nice and smooth without extra work. I was very happy with the quality of this one. This was my first HARE Polish but I can already tell it won’t be the last ;)

I bought this from Shoppe Eclecticco. This was my first experience with this store and it was a very positive first experience. I got answer to my question about restock for other brands within minutes via email (this of course must depend on the time of the day when you send your question). The order itself was deliver to Finland in a week. Great service in my opinion! Thanks!


ABC Challenge – D is for drip manicure

38

So it’s that time of the week again and this week it’s letter D! I chose to go for a nail art type instead of a polish name and did a drip manicure. It was a first time I gave this type of a manicure a try and I quite like how it turned out. Result could’ve always been better and next time I’ll pay a little more attention to details :P

I used two coats of OPI Pedal Faster Suzi! and then I used Flormar U29 and did the drips with a little help from a dotting tool. Quick and easy! I think that next time I give this a try, I’ll do pastel skittles drip mani.

I just really wish my nails would grow super fast and I could get to my ideal nail length already *sigh*


Essie Nourish Me – 4 weeks after

2

It’s been four weeks since I started using Essie Nourish Me base coat and the results are impressive as you might have seen from my previous week reports. The condition of my nails keeps getting better and this week I managed to file off all the damaged part from my left hand nails. There might still be a tiny bit of weaker part left on the right hand nails. I filed a good amount of off my nails before taking these photos and I’m hoping to finally be able to start the length growing project. I’m not gonna file anything off for the next two weeks just to see how the tips react to growing them out a bit. So next Tuesday I won’t be writing my usual week report but I’ll be back with some news in two weeks.

Here are the photos of how my nails look now after four weeks of using Essie Nourish Me hydrating base coat.


Left hand nails are now in a very good condition.
Right hand is looking pretty good too.

OPI – French Quarter For Your Thoughts

4

Today it’s just a basic creme manicure. Every now and then the bright colors and sparkling glitters can feel like a little too much and for those times it’s good to have these toned down basic colors in your stash. A little while ago I noticed that I don’t really have any grey cremes in my polish drawer and I’ve been keeping my eyes open for them ever since. I found this one from a discount bin earlier this week and since I’ve already considered buying it, I decided to give it a new loving home.

OPI French Quarter For Your Thoughts is a smoke/cement grey creme polish from the Fall 2011 Touring America collection. Formula is ok, maybe a bit on the thin side. This was quite streaky on the first coat but evened out very nicely with the second coat and I didn’t need to apply a third one. Dry time was normal with Inm Super Fast Drying top coat. I like this shade a lot. It goes well with my skin tone and gives a sophisticated look. Neutral shade that still has that something in it to make it special. Good buy :)


Pink dotting tool manicure

20

Today it’s my first try on a dotting tool manicure. It’s been a lot of first times for so many things for me and this blog lately. My last year was so insane that I had no time or energy to obsess over cosmetics or nail polish. Life is starting to return to normal and my inner cosmetics freak is raising it’s head again, big time. Lately I’ve also gotten into indie polish and been shopping a lot of those lately. I hope you guys are gonna be interested in what I’ve found from the indie world too cos there’s gonna be a lot of those coming up.

Oh well, on with the babble and let’s talk about this manicure ;) For this I applied two coats of Models Own Soda Pop Pink and let that dry for a bit. Then I used different size dotting tools with Color Club Where’s The Soiree?, OPI Alpine Snow and Models Own Moody Grey polishes to make the dots. Then I allowed the dots to dry for a little bit before applying the top coat to prevent them from smudging. This was a quick and easy manicure and IMO it looks pretty cool too.