Author: RiaG

ABC Challenge – H is for Hare Polish Swanky Soiree

12

Hello my lovelies, I’m back! I’m still not completely over the influenza but I’m better. This one really kicked my butt though. Had high fever, trip to the hospital cos of breathing difficulties, bad cough, you name it. Also hubby and the kids were very sick too. It was a pretty bad week here but thankfully it now looks like we are all getting better.

So I’m late with my letter H post but better late than never, right? I wanted to do some nail art this week but just didn’t have the time or energy to do it so I chose a cool H polish from my unused pile. This is Hare Polish Swanky Soiree. Here I have three coats and next time I think I’ll layer it with grey creme and just use one coat. This is an awesome looking polish and glitter really pops. I love it! It an unusual combination but it really does work.


Born Pretty Store Hearts review

14
I got to choose a product to test from Born Pretty Store and since Valentine’s Day is near I chose hearts. Here’s a direct link to the product. The store describes these as “iced mylar sheets” and I think that is pretty accurate. These are very sheer and change color depending on the angle of lighting.

These are very thin and easy to bend. I had no trouble placing these on my nails and I could hardly feel them through the top coat. I had to keep pressing the hearts back down a few times while the polish was drying since they were trying to straighten back up. After the polish was dry they stayed down nicely. I think these might work even better with some nail glue. Now I just applied the glitter polish and placed the hearts on top of the wet polish.

These change color in a rainbow-y way and I placed a few more on a sheet of paper with some white polish to better demonstrate the color change. This time I chose to use pearly white Color Club Oooooo La La and Wet n Wild Kaleidoscope glitter polishes but these would also go great with pink or baby blue shades. These are also perfect to use with acrylic or gel nails.

I got these from Born Pretty Store and they have a wide range of nail art supplies. They also offer free worldwide shipping. Please use the code “NZL91” when you order and get extra -10% discount.


***These were sent for review. Opinions are my own and are based on my own experience of the product.


Jindie Nails – Love Conquers All vol 2

4
I have written a review of this polish before but I wasn’t quite happy with the photos so here we go with a few more new ones.

You can purchase Jindie Nails polishes from their Etsy-store (which is sometimes closed) as well as LlaroweMei Mei’s Signatures and Ninja Polish. You can find the latest restock and other info from their Facebook page.

The next restock is going to be tomorrow, Saturday Feb 23. at 12 pm CET. I believe Love Conquers All is also included in that restock. So if you have fallen in love with this one, I suggest you be there at your computer ready to click this baby in your shopping cart. Might be the last change ever ;)


My nails are on fire!

10

On last week’s ABC Challenge Meredith from Perfectly Polished did these pink nails with Color Club Snow-Flakes. I liked the way those looked and it inspired me to try Snow-Flakes with neon orange. I chose Color Club’s Wham! Pow! from their Poptastic collection and it was just perfect for this look.

For these nails I used three coats of Wham! Pow! and two coats of Snow-Flakes plus Inm Out The Door top coat. The result made my nails look like they were on fire. This was such a bright combination, especially outside in sunlight :D


ABC Challenge – G is for Gussied Up Green

42

Happy hump day everyone! It’s time for our weekly ABC Challenge again. We are already at the letter G. Time really flies when you’re having fun, doesn’t it? So for G is chose China Glaze Gussied Up Green. This amazing green is from the 2008 Rodeo Diva collection which is one of my all time favorite collections from China Glaze. I can’t be sure if this is my first ever green nail polish but I think this is the one that started my passion for green.

Gussied Up Green is deep dark green shimmer. It has a certain glow to it that makes me love it so much. This applies very well and two coats was enough for an opaque result. I was thinking about stamping over it but after I got it applied I changed my mine. This one is just perfect on it’s own!


BG Cosmetics – Kimber’s Korner

12

Here’s the second of my three Bitch Glitz indieglitters. This polish was created for Kimber from Kimber’s Lacquer Korner. Go check out her awesome blog!

Kimber’s Korner is a cobolt blue jelly packed with a lot of glitter. For a glitterbomb this applies quite smoothly and surprisingly thin. I have four thin coats here for these swatch photos cos I wanted to achieve the depth that comes with jelly finish (I LOVE jellies). I will also try layering this over blue creme or shimmer polish too. As you can see on the photos, there’s a lot going on with glitter again. My favorite is the turquoise glitter in it. I think it makes this extra unique.

I just love indie polishes and glitter! There’s no way around that ;D


Born Pretty Store Pink bow knot review

12

Today I have another Born Pretty Store review for you and this time it’s pink bow knots. These are sheer-ish pink bows with a hint of glitter. The material is hard so they don’t bend at all. The size is rather large and the bottom is straight and smooth.

In this mani I used pink creme polish OPI If You Moust You Moust and added the white dots using a dotting tool and OPI Alpine Snow. I let those dry for a bit and added the top coat. After the whole manicure was dry I added a drop of top coat on my nail and placed the bow on it, pressing it down gently. If you want these to stay on for sure and for a little longer time I suggest you use strong nail adhesive or something similar.

These were very easy to place on my nail and they make a great addition to your party manicure. You might want to add these as a final touch to your look though, after you have done your hair and makeup. It’ll only take a couple of minutes to glue these on and you’re good to go.

You can buy these from Born Pretty Store and they also have a wide range of nail art supplies. Born Pretty Store offers free worldwide shipping. Please use the code “NZL91” when you order and get extra -10% discount.


***These were sent for review.


www.bornprettystore.com


My favorite blushes at the moment

6

I have two blushes I use way more than any others. I use these almost every time on my everyday makeup and when I want to play it safe. Theses blushes are NARS Orgasm and Torrid. They go perfectly with my warmtoned skin. Orgasm brings on the natural glowing peachy look and Torrid adds a little more color to it. I usually wear these together.

Orgasm is quite shimmery and glowing. You can’t end up with clown cheeks using this one but your cheeks can glow way too much in sunlight if you apply too heavily. Then again Torrid is very pigmented and I suggest you use a light hand applying this and check out the result in daylight before you leave home. These work together perfectly on my cheeks. First I apply contouring, then Orgasm and then the highlighter. I blend everything together smoothly and the last I add a light touch of Torrid for color.

In their pans these two look a lot alike but the swatch photo reveals the truth. Orgasm gives more of a natural glow and Torrid has a lot less shimmer and gives out a lot more color.

So these are my go-to blushes. What about you ladies, what is the blush you go for the most often?


Color Club – Cherubic

6

Today I have Color Club Cherubic for you. You already might have seen a photo of this on my yesterday’s post too. Cherubic is from Color Club’s 2012  Halo Hues collection. This collection had six holographic polishes. The holo effect is very strong on this one and top coat doesn’t reduce it at all. For this year Color Club is coming up with another six holoshades (YAY!) and you can have a little taste of what they look like on their Facebook-page.

Cherubic is nude/beige holo polish that applies nice and smooth. Dry time was also very fast. On this mani I used two coats of Cherubic and Inm Out The Door top coat. This time I didn’t have any base coat cos I have the UV-gel on my nails now.

I totally fell in love with this one! It’s just gorgeous and stunning! Now I’m obsessed about getting all the rest of these shades plus the ones that are coming out this year ;D


Quick UV-gel tutorial

16

This is my quick tutorial about how to use UV-gel to make your nails longer and stronger. The brand I use is Cesars Secerts and I buy it from a Finnish webstore. I’ve been using this brand for years and I’ve also gone through their training for both acrylic and gel nails. I’m not trying to teach anyone how to do their nails at home and I HIGHLY recommend going to training if you want to do your own nails. I’ll also do a quick explanation in English for each photo, but if you live outside of Finland I have no idea where you can buy Cesars Secrets products. There must be stores for at least European countries. Google is your friend :)


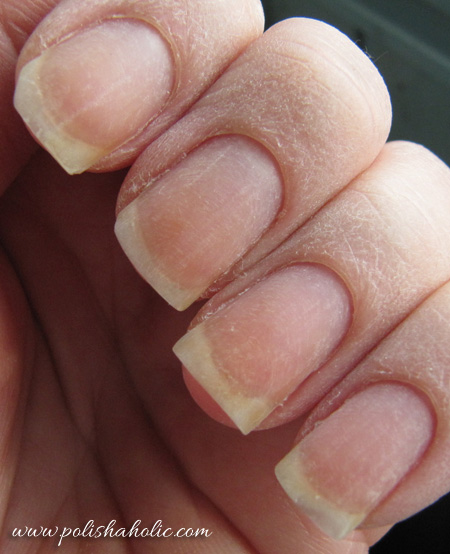
I have now prepped my nails for the UV-gel. I pushed my cuticles back and filed my nails lightly using 240 grit file. You can’t pay too much attention to this part. If you slack off and not do this properly your gel is sure to start lifting sooner than later. The super thin part on the tip of my pinky is cos of peeling and breaking, not too much filing.


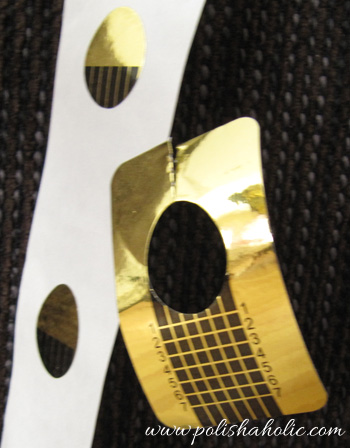
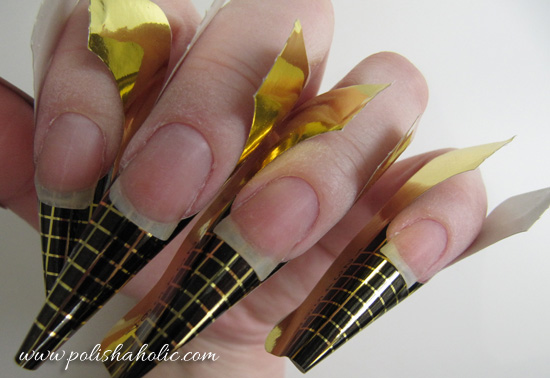
Next I wipe the dust of the nails using Cesars Secrets Cleanser liquid and I place on the nail form stickers starting from pinky and finishing with the thumb. It’s very important not to touch the prepped nails during this process.


Nail form stickers are now in place and you might want to wipe your nails with cleanser one more time just in case you touched them while placing the forms. After this I apply Cesars Secrets Primer 1 and Primer 2.


.

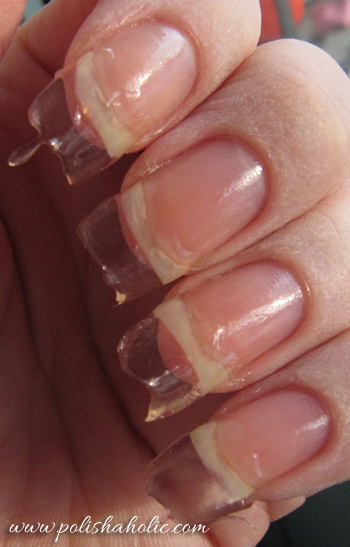
I applied a thin coat of gel on the tip of the nails to add some length, cured the nails under a UV-light for 2 mins and removed the forms carefully. I usually apply a thin layer of gel on the nail bed too but this time I decided to try a different way.


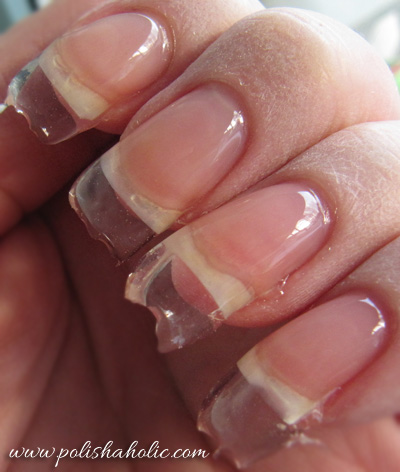
Here I have applied the gel on the whole nail. I used Cesars Secrets Builder gel  for everything and I cured my nails in UV-light for 2 mins again. After the nails are done I wipe the sticky surface using the Cleanser liquid. The tips are still a mess but the surface of the nail is nice and smooth.


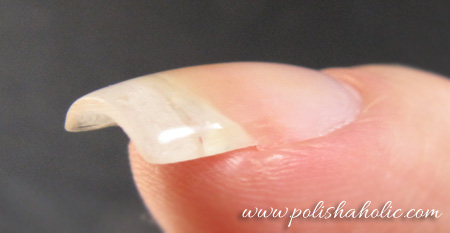
I filed my nails in shape by using 180 and 300 grit files. After this I carefully remove the dust of my nails and apply a thin layer of Sealing gel and cure that for another 2 mins.


I finish my nails off by wiping the sticky surface with Cleanser liquid and my nails are done. I used an electric file under my tips to make them matte. Since I always use nail polish the clear extensions don’t bother me any and I was just too lazy to do the french tips.


I tried to keep the layer of gel thin-ish and the shape of the nail natural.


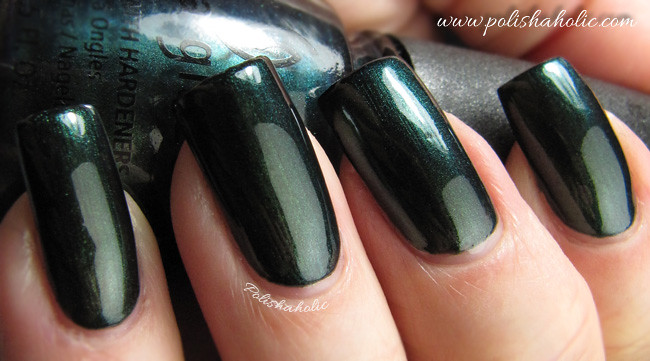
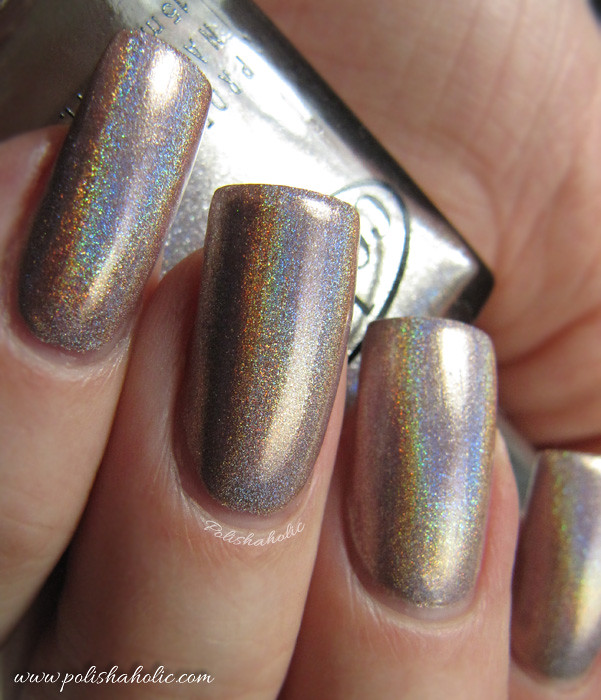
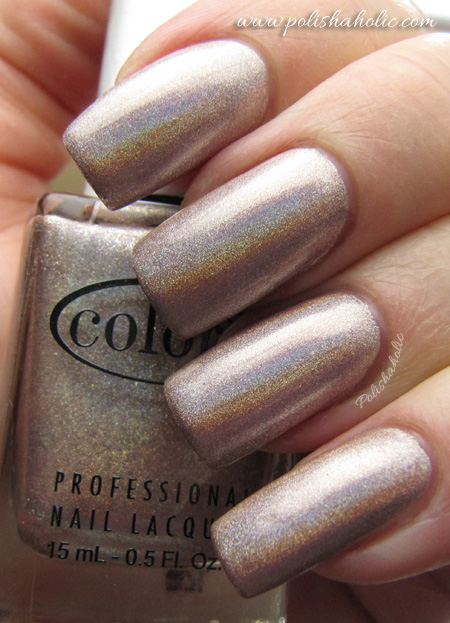
And I finished it off with an ultimate test, holographic nail polish that shows every little mistake and flaw there is to show. No pumps or dents showing, great! The polish is Color Club Cherubic and I’ll have a whole another post about it tomorrow.

So that was my quick tutorial on how I coated my nails using UV-gel and gained some extra length using nail for stickers. If you have any questions please leave a comment and I’ll be glad to answer :)