Category: Nail Polish

Color Club Poptastic Collection – Mrs. Robinson

3

Nyt seuraa tunnustus :P Tämä on ensimmäinen kerta yli kuukauteen, kun lakkasin kynteni. Loppuraskaudessa ei enää jaksanut keskittyä kynsiin ja vauvan synnyttyä energiaa oli vielä vähemmän. Noin pitkän tauon jälkeen teki mieli lopettaa kuiva kausi jollakin räväkällä sävyllä ja valitsin siihen tarkoitukseen Color Clubin Mrs. Robinson sävyn uudesta Poptastic neon kokoelmasta.

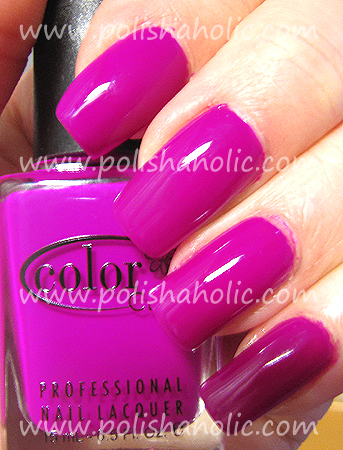
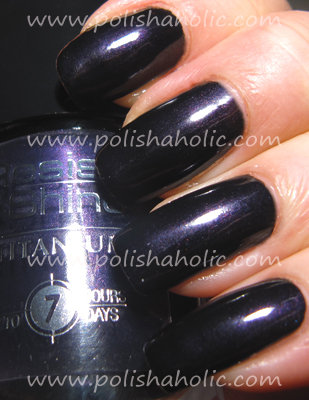
Here’s a fun fact for you guys :P This is the first time in over a month that I have polish on my nails. Late pregnancy didn’t make me feel like doing my nails and after the baby arrived I had even less energy. After a break that long I needed an energetic shade and I chose Color Club Mrs. Robinson from their new Poptastic neon collection.

This shade is very close to the Power Play shade from their older neon collection. I don’t know if it’s cos of the age of my Power Play bottle but I can see a slight difference between these two shades. I also tested them next to each other on a piece of clear plastic and I was still able to see the difference. Unfortunately this polish is a BIG pain in the butt to photograph and my camera isn’t able to capture the subtle difference between these two shades.

The quality of this polish is excellent. It’s thin, applies like butter and is opaque with two coats. It also dries fast. This is a perfect shade for my skin tone and cos of the great quality I will be using this one more than once.

The photo does not do justice to this shade at all. It is real hot-neon-purple and the camera just sucks all the life out of it :( It might not be a truly unique shade but it sure is beautiful.

On this mani i used: OPI NNS x1, Mrs. Robinson x2 and Seche Vite on top.


Color Club – Worth The Risque

6

After all of those red Christmas manis I felt a need to have something a little more neutral on my nails. Color Club Worth The Risque is a perfect choice for that plus there’s something festive about it so it’s great for preparing for New Years Eve ;)

Worth The Risque is silver-y grey holographic polish. It’s quite thin and applies very well. Two coats is enough for an opaque result and it dries quickly. The holographic effect is not too strong but it’s still clearly visible. I love the quality of Color Club holographic polishes. They are all very easy to apply, well pigmented and they dry real fast.

In this mani I used: OPI NNS x2, Worth The Risque x2 and Seche Vite on top.


Ruby Pumps for Christmas!

4

This is my actual Christmas manicure, China Glaze’s stunning Ruby Pumps. This is the most christmas-y polish I own. I meant to do a little Konading too but i ran out of time. Oh well, Ruby Pumps is just perfect on it own :)


Color Club – Reddy Or Not

5

Näin joulunaikaan punaiset kynnet kuuluvat asiaan. Niinpä päätinkin tällä kertaa lakata kynteni Color Clubin Reddy Or Not sävyllä. Tämä on yksi täydellisimmistä omistamistani punaisista creme lakoista. Kirkas paloautonpunainen, oranssipohjainen sävy on todella näyttävä. Jos haluat omistaa ainoastaan yhden punaisen creme lakan tämä olisi erittäin hyvä valinta.

Christmas time is here and what would be a more perfect color for a mani than bright red? So here we go, Color Club’s Reddy Or Not. This is one of the most perfect red cremes I own. Bright, orange based, firetruck red shade. If you only want one red creme this is a great choice.

Reddy Or Not is also perfect quality. It applies like butter, is very well pigmented and dries fast. Two coats was enough for my nails.

In this mani I used: OPI NNS x2, Reddy Or Not x2 and Poshe on top.


More green nails – Color Club Under The Mistletoe with Sally Hansen Glow

6

Green manicure once again :D This time I wanted to try my new Under The Mistletoe shade, the green glitter polish from Color Club’s Wonderland collection. Since removing glitter polish is still big pain in the butt (IMO) I decided to put regular polish underneath it and I chose to use Sally Hansen’s shade Glow.

Under The Mistletoe is a sheer green polish with a lot of silver glitter in it. It looked so sheer in the bottle I thought it would be a good idea to apply a couple of coats of Glow first and only one coat of glitter polish. This helps the removing process too. The gold shimmer on Sally Hansen’s Glow transformed the silver glitter in Under The Mistletoe into a more gold-ish shade. The effect doesn’t fully show in these pics but the result was really beautiful :)

In this mani I used: OPI NNS x1, Sally Hansen Glow x2, Under The Mistletoe x1 and Poshe on top as usual.


Sinful Colors – San Francisco

6

I got this Sinful Colors shade San Francisco from my trip to USA in August. Took me this long to try it out.

This is a really bright kinda poison green looking to me and it has a lot of micro-glitter in it. Shade is gorgeous and as a big green lover I just had to have it ;)

San Francisco is surprisingly sheer and it takes three coats for longer nails to be opaque. It also took quite a long time to dry but the cheap price and the stunning green shade makes the negative things much easier to handle. This lasted without chipping for several days and the removing wasn’t too bad either. Next time I’ll use two coats of base coat though cos this dyed my nails nasty green.

In this mani I used: OPI NNS x1, San Francisco x3 and Poshe on top.


L’oréal Resist & Shine Titanium – 732 Black Violet

7

I bought my first polish from the new L’oréal Resist & Shine Titanium Blackgloss collection, shade 732 Black Violet. This is a very dark violet and in some lights it just looks black. In a little bit brighter light you can see the violet shade clearly though. Polish also has fine shimmer in it but you can’t really see it on the nails under a normal light. This is a very beautiful polish and I have already today gotten compliments on how pretty my nails look ;)

Black Violet is quite thick in the bottle but not impossible to apply. You shouldn’t even try to apply two coats of this cos it’s just too thick on the first coat. In this case thickness doesn’t really matter though cos this polish is so highly pigmented that you’ll have an opaque result with just one coat. Regardless of a thick layer of polish it dried very fast with Poshe.

I’m actually a bit surprised on the quality of this polish. Just one coat and a very intense and opaque result. I think I’m gonna at least get the blue and turquoise shades from this collection too. These are on stores for limited time only so go get yours while you can.

In this mani I used: OPI NNS x1, Black Violet x1 and Poshe on top. Pics taken under a very bright artificial light.


Black for Halloween! OPI – Baby It’s “Coal” Outside!

6

I’ll continue with the same theme and now it’s charcoal black for the Halloween week manicure. OPI Baby It’s “Coal” Outside! is from the Holiday In Toyland 2008 collection.

Baby It’s “Coal” Outside! is black, shiny polish with silver micro-glitter. This applies pretty well and needs at least two coats for an opaque result. With Poshe this dried quickly too and the result is SHINY! Perfect shade for the time of the year and Halloween parties :D

In this mani I used OPI NNS x1, Baby It’s “Coal” Outside! x2 and Poshe Super Fast Drying TopCoat.


Borghese – Espresso Brown

2

Then more shopping from my trip to States. Borghese Espresso Brown is coffee brown polish with lighter brown shimmer. This is a spicy shade that is perfect for fall time. This was my first experience with Borghese nail polish and I’m happy with the quality.

Espresso Brown is a bit on the thick side and the first coat applied unevenly. The second coat fixed all that and it looked perfect. Two coats was also enough for opaque result and this dried fast.

In this mani I used: OPI NNS x1, Espresso Brown x2 and Poshe Super Fast Drying Topcoat.