Category: Nail Art

Polishers Inc. – So 90’s!

16

Polishers Inc. Sunday is here again! Today’s theme is “So 90’s!”. First thing that came to mind was Nirvana and grunge but I decided to do something bright and fun instead and got inspiration from early 90’s crazy clothing and colors.

Index and middle finger nails are done with a little help from NailVinyls. Ring and and pinky nail have slices cut out of dried watermarble sheet.

Base color is Essie Licorice. Other colors used are OPI Hey Baby, OPI Live.Love.Carnaval, OPI Where Did Suzi’s Man-Go?, OPI I Just Can’t Cope-Acapana, China Glaze Def Defying and Color Club Wicker Park. Shine is provided by Glisten & Glow HK Girl top coat.

That’s all from me this time and please don’t forget to check what the other ladies have come up with this week. You can find the links at the end of this post. Thank you for reading!


Polishers Inc. – Safe and Sound

12

Today’s Polishers Inc. theme was Safe and Sound aka my comfort zone manicure. For me the bright red polish is always a safe choice. I love red nails and red looks great with my skin tone. I also love to use studs and rhinestones. They are so quick and easy to use and nearly impossible to mess up.

For this manicure I used a coat of Essie Nourish Me, a coat of Glisten & Glow Stuck On Blu!, two coats of Delush Polish Glam Squad and HK Girl top coat. I also used different sized clear rhinestones plus black and silver studs for these nails.

Don’t forget to check out the links at the bottom of the post and show some love for the other lovely ladies in this group :)


Mavala Nude Colors and a dry brush manicure

6

I’ve already shown you the new Mavala Spring 2015 Nude Colors collection here and this time I used all the polishes from this collection to do a dry brush manicure.

I started by applying a coat of 112 Pink Boudoir on a coat of Essie Nourish Me. This one was pretty well behaving and one generous coat evened itself out nicely and dried fast. I really liked this powdery soft pink so I ended up wearing it alone for a day before doing to dry brush manicure.


For this dry brush design I used all the polishes on this collection. I love how matte polishes leave such nice textured look on the nail. Very quick and easy to do. This soft looking design also goes really well together with brighter spring colors.


***This collection was sent for review.
 

Freehand lace nail art

8

After two days my KIKO 512 (see the original post here) manicure still looked so good that I decided to practice some free hand lace nail art on it before removing the mani.

I used my Pure Color NO. 10 brush and white acrylic paint for this design.


***Products used for this manicure were purchased by me.

Polishers Inc. – All-time Favorite

16

Today is Polishers Inc. day again and this time the theme was All-time Favorite as the polish you love the most. To me that was an easy one. It’s OPI Kinky In Helsinki and it’s my favorite polish cos of the emotional value this exact bottle has. Don’t get me wrong though, this is a GORGEOUS polish but to me it’s more than just that. I’ve had this bottle since 2003. It was a gift from my then boyfriend, now a husband and he brought it with him from Texas the first time he came to Finland.

I wanted to do keep this manicure mostly about the polish and not cover it up with a lot of nail art. My first idea failed miserably but it also gave me this idea that turned out looking much better.

I started with two coats of Kinky In Helsinki and let those dry well. Then I stamped a heart pattern from XL-O stamping plate using Konad Vivid Pink. Next I applied a coat of Kinky In Helsinki and I kept the coat so thin you can still see the stamping through it. Last I added a coat of HK Girl top coat.


In real life the pattern is a little more visible than in these photos and it has a certain glow to it. I’m happy with the result and maybe I’ll redo this manicure for Valentine’s Day :)

Don’t forget to check out the links on the bottom of the post and go check out what the other talented ladies came up with this week :)


Negative space animal print manicure

22

Hello lovelies! I hope everyone had a great New Year’s Eve and a good start to the year 2015 :)

I’m going to start my blogging year with some free hand nail art and a negative space animal print manicure. Lately I’ve really been enjoying doing some nail art and since I like hand painted decorations I decided I needed a few things to make my life a little easier. So I recently ordered two nail art brushes that are pretty popular and recommended by other nail bloggers. First one, Pure Color NO. 10 already arrived from StylishNailArtShop. Shipping was super fast and I was more than happy with the brush. I think I have some more shopping to do at their store ;)


For this manicure I applied Essie Beam Me as a base coat and then taped the middle of the nail with a slice of blue masking tape. I applied two coats of OPI Over & Over A-Gwen and immediately removed the tapes. Then I applied a coat of HK Girl and let everything dry for a bit.

Next I added the spots on index and middle finger nails using my tiniest dotting tool and Art Club Nail Art Liner You’re Golden. Then I added the stripes on the ring finger and pinky nails using the liners own brush. I let these dry for a bit and then took some black acrylic paint and my new Pure Color brush and painted the black details. At last I added another coat of HK Girl top coat.


***I don’t benefit from clicking any of the links on this post

Holiday nails for the last time this year :D

12

This is the manicure I actually had on for Christmas. The gorgeous green glitter is Jindie Nails A Surprise Inside. This is two coats alone on Glisten & Glow Stuck On Blu and topped with two coats of HK Girl.

Ring finger nail has a tree made with little triangle shape DIY decals I cut out of a watermarble sheet I left drying in the water. I placed some glitter pieces from A Surprise Inside on the tree and added the snow using white acrylic paint. The nail art was inspired by mymaynails and Mucking Fusser in IG.


You can buy Jindie Nails polishes from JindieNails.com or from authorized distributors. You can find the latest news, releases and restock info from their FB and IG.

Now I’m most definitely done, done DONE with all kinds of Holiday manicures :D


A Surprise Inside was sent for review. I don’t benefit from clicking any of the links on this post

Polishers Inc. – A New Technique

20

Hello everyone! I hope you guys are having a great Sunday :) I got an honor to join Polishers Inc. and this is my first post with them. I’m so excited to do this :D

“Polishers Inc. is a group of European nail bloggers that want to exchange their ideas about nail art and inspire each other! We post every first and third Sunday of the month.”

Other ladies in this group are (and what a group it is) :


Annie (Polish This!)
Charlotte (Chakalacquer.dk)
Coco (Coco’s Nails)
Emma (Wasting Lifestyle)
Karine (Nailderella)
Malene (Nail Escapades)
Maria (rijaH.dk)
Milena (Nail That Design)
Mina (Cubbiful)
Paulina (Paulina’s Passions)
Tamit (fall in…naiLove!)


Today’s theme is “A new technique” and I decided to try foil stamping. A while ago I saw someone mention foil stamping in FB and I just had to find a tutorial instantly. I watched a couple of YouTube videos and decided it was definitely something I wanted to try. Now today’s theme gave me a perfect opportunity to do so.


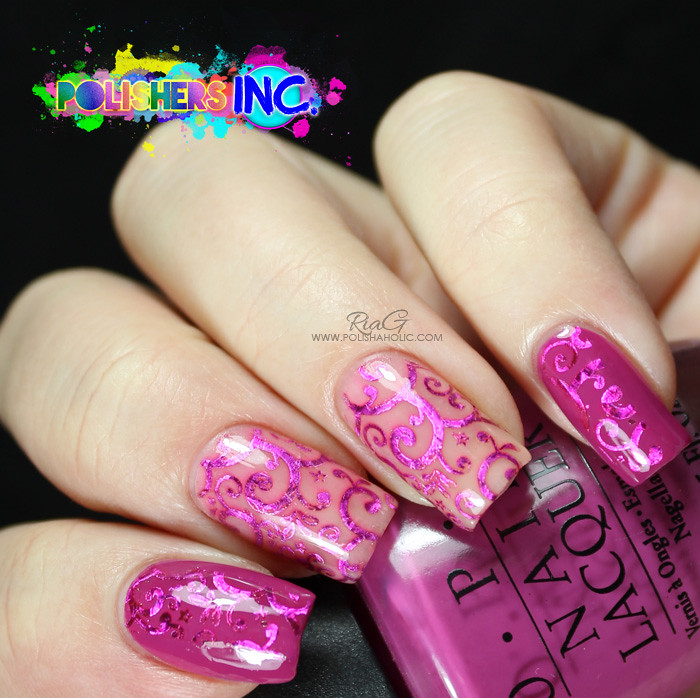
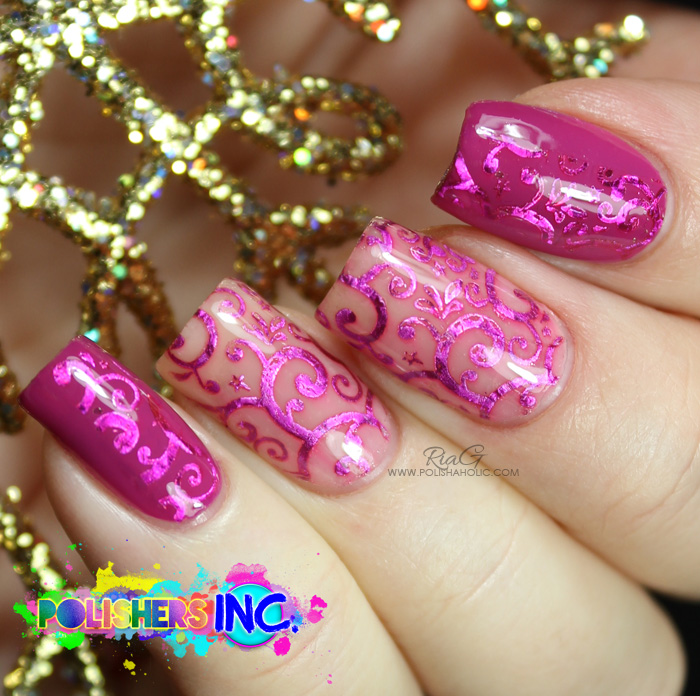
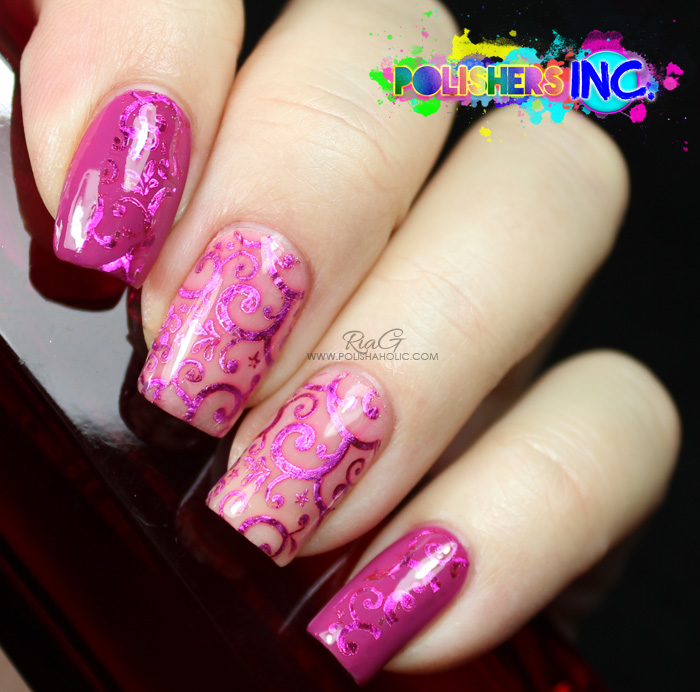
I started by applying a coat of clear polish on a minigrip bag and let it dry. Then I stamped a pattern from hehe 004 stamping plate using Konad Pinky Red stamping polish and immediately pressed a pink transfer foil over the pattern. I removed the foil and allowed the design to dry for a bit. I made a few extra ones for practicing cos I knew I was going to mess it up at first. Then I applied a coat of top coat and let everything dry again.

After the self made decals where dry I peeled them off the minigrip bag and cut them slightly smaller and into shape. I applied a coat of polish on my nail, placed the decal and gently pressed it on my nail. I slowly worked it on the nail, pressing down, cutting some more of the sides and using a brush dipped in acetone to shape it near the cuticle line. When I got it to look well attached and smooth on the nail I added a coat of HK Girl top coat.

For index and pinky nails I cut a slice off the decal and placed those on the middle of the nails. When they were fully attached I sealed them in with HK Girl.

On the nude base full nail design you can see that either the stamping polish or the foil bled into the base a little but it doesn’t look bad so I left it be. I really loved how these turned out. The foil gave a really nice look to the stamping pattern and I can see a lot more uses for this technique. This was also my first time doing my own decals and even if it was a bit more work it was totally worth it. Now I can’t wait to try reverse stamping :D

If someone is wondering why I didn’t just press the foil straight on my nail instead of making a decal here’s why. The foil didn’t attach on the pattern perfectly each time and some of the decals were useless. It was also a lot easier to press the foil on pattern/plastic bag laying on a smooth table surface instead of a curvy nail.

The polishes used for these nails:

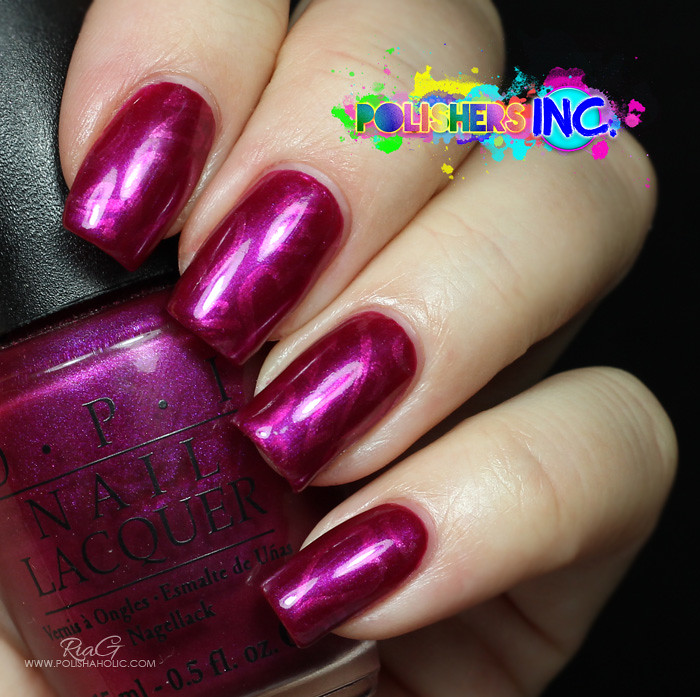
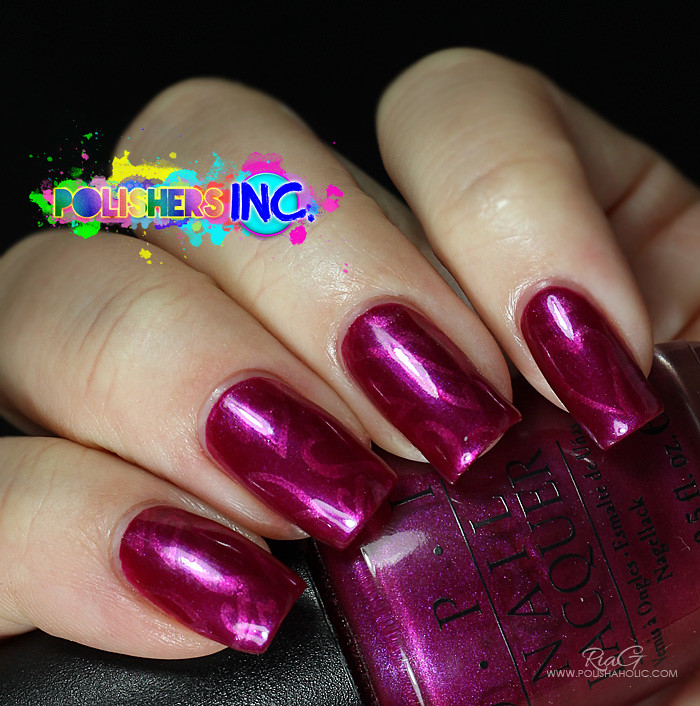
Index and pinky: a coat of Sally Hansen Nail Rehab, a coat of Glisten & Glow Stuck On Blu!, two coats of OPI Ate Berries in the Canaries, a slice of foil stamping decal and HK Girl top coat.

Middle and ring finger: a coat of Sally Hansen Nail Rehab, a coat of Glisten & Glow Stuck On Blu!, a coat of Essie Sugar Daddy, full nail foil stamping decal and HK Girl top coat.

Thanks for reading and please check out the links at the end of the post to see what everyone else did for today :)


***All the products were purchased by me. I don’t benefit from clicking any of the links on this post.

piCture pOlish pretties and Holiday nail art

12

Since I didn’t die at the dentist (had another wisdom tooth pulled) today I guess I can sit down and show you the nails I did a couple of days ago.

For these I used Sally Hansen Nail Rehab and Glisten & Glow Stuck On Blu! as base coats.

I applied a coat of Essie Sugar Daddy, a coat of Glitter Gal Galaxy Holo Top coat  and HK Girl fast drying top coat on my thumb, middle and ring finger nails.

Then I applied two coats of piCture pOlish Kryptonite on my index finger nail and two coats of O’Hara on my pinky nail and topped them with HK Girl top coat.

After the thumb, middle and ring finger nails were completely dry I placed NailVinyls chevron vinyls on the middle of my nails and used the two piCture pOlish colors to paint next to the cuticle and the tip of the nails. This style was inspired by one of Sloteazzy’s manicures I saw in IG. Obviously the colors I used are completely different but either way I got an idea for this chevron manicure from her :)

I let the polish dry again and then I used a thin nail art brush from Born Pretty Store (review coming up) and white acrylic paint to free hand the snow flakes on my nails. I sealed the nail art in with another coat of HK Girl and done!


***Glitter Gal Galaxy Holo Top coat and nail art brushes were sent for review. piCture pOlish polishes and NailVinyls were purchased by me. I don’t benefit from clicking any of the links on this post.

White and gold holiday nail art

24

Today’s post is part of Finnish Beauty Bloggers Christmas calendar. I did today’s post together with the lovely Emma from Wasting lifestyle blog. Our idea behind the nail art was “Poor woman’s luxury” type of thing. So since I don’t have money to buy myself expensive diamonds I turned my nails into beautiful jewelry :D


For these nails I used:

Index: One coat of Sally Hansen Nail Rehab, two coats of Dance Legend Mountain Snow white texture polish

Middle: One coat of Sally Hansen Nail Rehab, two coats of Wet n Wild Break the Ice white shimmer and Dollish Polish Drooling Over Your Polish (CesarsShop Exclusive) glitter dabbed on parts of the nail.

Ring finger: One coat of Sally Hansen Nail Rehab, three coats of Dance Legend Zolotaya Ribka (Goldfish)

Pinky: One coat of Sally Hansen Nail Rehab, one coat of Wet n Wild Break the Ice. Gradient done with Dance Legend Zolotaya Ribka and textured pattern was done with Dance Legend Mountain Snow.

I had a secret weapon to help me place all those micro pearls and rhinestone and I will reveal that in another post ;)


***Dance Legend polishes, Wet n Wild Break the Ice and micro pearls were purchased by me. Dollish Polish Drooling over your polish and Konad rhinestones were sent for review. i don’t benefit from clicking any of the links on this post.