Category: Nail Art

My New Years Eve nails

4

I welcomed the New Year at home shopping nail polish online, talking to other polish fanatics in Twitter and sipping some Fresita strawberry sparkling wine ;)

For my manicure I used two coats of Color Club Pucci-Licious, two coats of Sally Hansen HD Hi-Definition in DVD and Inm Super Fast Drying Topcoat. After the polish was dry I used some nail art tape for the stripes and applied one more coat of Inm Northern Lights Hologram Topcoat Gold. This was very shiny and sparkly IRL, just perfect New Years Eve manicure!


First try on a cloud manicure

3

I decided to give this cloud manicure a try after seeing Sannu’s blog and her beautiful Christmas nails. From her blog I also found a link to this tutorial on how to do this mani.

I used Color Club’s Ms. Socialite, Worth The Risque and Wild At Heart. I think this turned out quite nice and good looking for my first try. Next I gotta try this with some pastel colors and adding some details.


New Years resolutions: More nail art

0

This time of the year you usually come up with some New Year’s resolutions. I tend to not make any since I’m really bad at keeping the promises I make to myself. Let’s see how it goes with these ones I make for you guys.

My first New Year’s resolution is that you’ll see a lot more nail art and special manicures on my blog during the year 2013.

Here’s an example photo of a quick tape manicure using Color Club Where’s The Soiree? over China Glaze Ruby Pumps.


Holiday theme month: hmmm… pink!

2

I came up with the idea of using polish or color that is totally not typical for the season on the blog comment box of the lovely Charming Nails and decided to put the idea in action right away. To be honest I started to get a little bored with gold, red and green and it felt really refreshing to paint my nails neon pink using Color Club Poptastic.

This first try didn’t really turn out too great. I did some different patterns from the XL Christmas stamping plate using white Konad Special polish and added some red acrylic paint for details. I also used Color Club Worth The Risque on my pinky and to add some details and dots.

This idea had potential to be great if I had a little more time to plan and do the decorations. I could’ve done Rudolf with his red nose and maybe some Christmas lights. Add some more color to it. Oh well, I will definitely do this “Not for the season polish” -theme thing again in the future.


Holiday theme month: Oh Christmas tree…

5
And here’s the mandatory Christmas tree manicure. A little too much glitter for my taste after all and I’m starting to get enough of it for now. A little less bling bling for me now ;)
I used two coats of OPI Big Apple Red and one coat of OPI Rainbow Connection glitter polish. The ring finger Christmas tree is done with the XL Christmas stamping plate and green Konad Special polish. I fixed it a little with a nail art brush, added bigger glitter pieces from Rainbow Connection and some dotting tool Christmas balls with Color Club Worth The Risque silver holographic polish.


Holiday theme month: Purple “bling” manicure

1

Instead of nail stamping art I decided to do these rhinestone nails this time. The polish is gorgeous Color Club Winter Wonderland from their Holiday 2012 collection. Vibrant purple shade with a lot of pink shimmer. Lovely!

In this mani I used two coats of basecoat, two coats of Glitter Wonderland and INM Super Fast Drying Top Coat. On top of those I glued some different size rhinestones and micro-pearls.


Holiday theme month: Let it snow!

3

Here’s a blue snowflake manicure. I used the amazing blue shimmer polish, OPI Yoga-ta Get This Blue! for the base and silver Konad special polish for stamping. The patterns are again from the XL Christmas stamping plate that I got from a Finnish webstore. That plate has a lot of snowflake images and I used a few of the for this manicure. As a topcoat over the stamping I used Inm Northern Lights Hologram Top Coat Gold which adds a little sparkle. Silver one would’ve been better so I have to add that to my shopping list.

My hand is still a little shaky while I do the stamping so some of the patterns aren’t as sharp looking as they could be. I just gotta keep practicing I guess :) I really liked this look too and it was a nice using blue nail polish for a change. I can’t even remember the last time I had blue on my nails.

Do you guys prefer these manicures with some nail art on them over regular swatch photos or should I just keep doing both?


Macro shot shows how amazing Yoga-Ta Get This Blue! is.


Holiday theme month: Pink and silver glitter nails

3

Today it’s a pink and silver glitter manicure with some nail stamping art. Few days ago I promised to use my new XL Christmas stamping plate at least once before Christmas and now I’ve lived up to that promise. I haven’t used any nail stamping stuff for the longest time so I wanted to start with something easy. I’m pretty happy with how this turned out and I’m definitely going to use my nail stamping stuff more from now on.

First I applied the basecoat and then two coats of OPI Pedal Faster Suzi!, a gorgeous cold tone pink shimmer. For about half the nail I applied a thin layer of China Glaze Tinsel, a fine silver glitter. On the tips I added some Color Club Wonderland silver glitter polish, which is a little more rough and sparkling than Tinsel is. After that I stamped the patterns from my XL Christmas stamping plate using white Konad Special polish.


OPI Pedal Faster Suzi!, China Glaze Tinsel, Color Club Wonderland.


Super-macro shows the little round glitter from Tinsel and bigger square glitter in Wonderland.


Holiday theme month: Purple and pink glitter gradient

4

Tips of my nails are still a little weak after removing the gel nails and the past few days I’ve been using glitter polishes to give my tips a little more protection. There’s not much of the damaged part left that still needs to be grown out and then I can start growing my nails a little longer again.

This time I did a purple and pink glitter gradient manicure. First I applied basecoat and then two coats of Color Club Alias. On top of that I applied a coat of Color Club Candy Cane fading it towards the cuticles. At last I applied a coat of Sally Hansen’s Strobe Light on about a half of the nail. I topped it off INM Out The Door Super Fast Drying Topcoat.

I really liked this manicure and the photos just don’t do enough justice to all the bling and sparkle there was.


Color Club Alias, Color Club Candy Cane and Sally Hansen Strobe Light
Super-macro shot

Holiday theme month: Gold and glitter nails

3

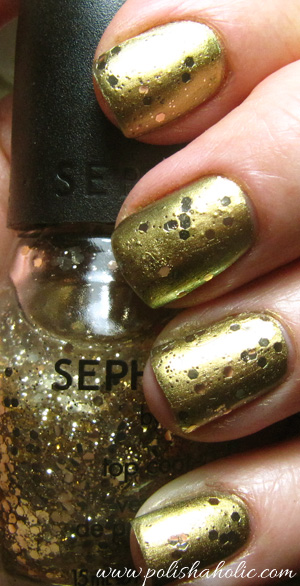
This time I went for a golden manicure. I applied two coats of Color Club Editorial, golden duochrome with some green in it, yet another Chanel Peridot dupe. On top of Editorial I applied a thin layer of Sugarpill ChromaLust Loose Eyeshadow Goldilux with a brush. Goldilux created an amazing shiny golden, almost mirror-like effect on the nail. Unfortunately for what ever reason Editorial bubbled and that ruined the effect. So I had to try and save the manicure with one coat of Sephora by OPI Only Gold For Me glitter top coat. It ended up looking ok. Someday I will try and use Goldilux again with a different basecoat and just one coat of Editorial.

Next I have to use Goldilux in a golden makeuplook. This loose eyeshadow is so fine and well pigmented. One on the most amazing gold eyeshadows I have ever seen. Depending on the base you use the finish can be quite metallic too. I’m totally in love with Sugarpill eyeshadows and after some Black Friday shopping I have two 4-color palettes and four more Loose Eyeshadows coming my way.

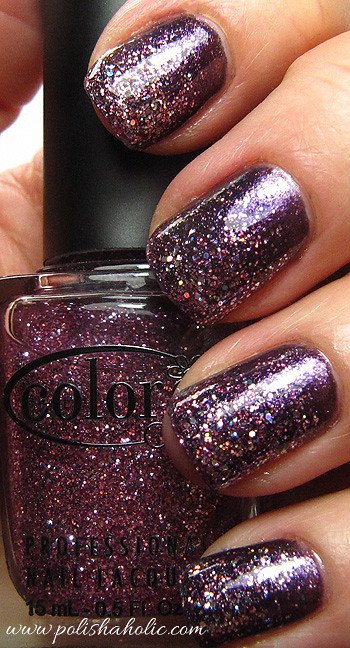
In this mani I used: Poshe Nail Strengthening Treatment Basecoat x2, Color Club Editorial x2, layer of Sugarpill Goldilux Loose Eyeshadow, Sephora by OPI Only Gold For Me x1 and fast drying topcoat INM Out The Door.

You can buy Sugarpill eyeshadows from their own webstore here.


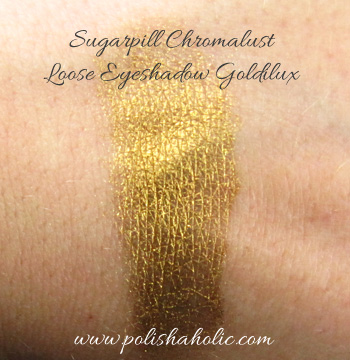
Very well pigmented loose eyeshadow.
Swatched over clean skin, no base.
Sugarpill Goldilux is a stunning gold shade.