Author: RiaG

Delush Polish – Bitchcraft

18

This beauty is Delush Polish Bitchcraft from the Scream Supreme collection. Every polish on this collection is just stunning and unfortunately I couldn’t afford to buy all of them. I do have three to show you though and this is the first one of those three, Bitchcraft.

This is a gorgeous black jelly glitterbomb. I turned the bottle upside down before application to help the largest dots to come out easier. Cos my nails are quite curvy I did move the biggest glitter pieces to the spots were they laid flat. Other than that no glitter placement was needed. Very good formula that was easy and even to apply and dried quickly. This can be worn alone too but I decided to layer it over a black creme to really make the pink glitters pop.

For this manicure I used a coat of Sally Hansen Nail Rehab, a coat of Glisten & Glow Stuck On Blu!, a coat of Essie Licorice, two coats of Bitchcraft and two coats of HK Girl top coat to smooth out the glitters.


***Bitchcraft was purchased by me.  I don’t benefit from clicking any of the links on this post.

A England Gloriana nail art

6

Lately I’ve felt a big need to do some nail art with my new polishes instead of just taking swatch photos. Though I try to keep it so that you guys can still get a good look of the polish too.

This time I used A England Gloriana from the Elizabeth & Mary collection (and what a stunning collection it is). The formula on this was great! Application was very smooth and this was a one coater (!!) with a normal dry time. I really must have a couple of more polishes from this collection. So pretty!

For thumb, index and pinky nails I used a coat of Sally Hansen Nail Rehab treatment, a coat of Glisten & Glow Stuck On Blu! base coat, a coat of Gloriana and HK Girl top coat.

For middle and ring finger I used a coat of Sally Hansen Nail Rehab treatment, a coat of Glisten & Glow Stuck On Blu! base coat and a coat of Essie Sugar Daddy for a nude base. I let the base dry and used Born Pretty Store stamping plate 05 and Gloriana to stamp the pattern on the nails. I also applied a coat of HK Girl and let everything dry again. I wasn’t looking for crisp clean lines for the patterns and Gloriana didn’t give those either. I wanted the stamping to look old-ish and fading and it did. I test stamped with Gloriana on a plastic tip cos I wanted to make sure it looked right for the manicure.

Then I cut wavy pieces off of blue masking tape and placed them on to the nails. For middle finger nail I used a coat of Essie Licorice and for the ring finger a coat of Gloriana to cover the parts that the tape left uncovered. I immediately removed the tapes and added the dots using a small dotting tool and Essie Licorice. I let the nail art dry for a bit and then added a coat of HK Girl.

Is me explaining the process of creating these manicures enough or would you sometimes like to see tutorials too?


***Gloriana was a gift. Stamping plate was sent for review. Essie polishes were purchased by me.  I don’t benefit from clicking any of the links on this post
 .


Sparkling nude-ish nails – Mavala 311 Beige Ivory and 138 Magic Spice

18

Today’s manicure is perfect for someone who maybe wants a little something sparkling for the Holiday season parties but doesn’t really like classic red nails and would never wear green or any other standout color. You just want your nails to be chic-ish and neutral. Well this is a manicure for you :)

For this mani I used:

A coat of Sally Hansen Nail Rehab (This still works wonders for me and has become my go-to nail treatment).

A coat of Glisten & Glow Stuck On Blu! (Creates a perfect sticky base and prevents staining. Also works great for me!).

Two coats of Mavala 311 Ivory Beige from the Fall 2014 Sublime collection. Very nice formula. A bit on the thin side but applied very smooth and evenly. This was opaque with two coats. Very beautiful neutral color on it’s own and a perfect base for some nail art. Will definitely use this one again too.

Mavala 138 Magic Spice from the Holiday 2014 Magic Stardust collection is dabbed on the side of the nails. A very beautiful glitter that also goes perfectly with the 310 Espresso from the Sublime collection.

Finished with a generous coat of HK Girl top coat (Still the best fast drying top coat I’ve ever tried).


***Both polishes were sent for review.  


Glitter Gal holo manicure

10

I decided to do a manicure using two beautiful Glitter Gal Australia holo polishes Love Bite and Blush. I also wanted to use my NailVinyls since it’s been a long time I did anything with those either. I chose the star shape pattern vinyls from my untrieds pile and used those on my thumb and ring finger nails.

For this manicure I used a coat of Sally Hansen Nail Rehab, a coat of Glisten & Glow Stuck On Blu!, two coats of Love Bite on my index and pinky nails and two coats of Blush on my thumb, middle and ring finger nails. I also used HK Girl top coat as usual.

Looking at the photos now I think this look could’ve used some silver glitter with the stars. Oh well, polishes are stunning anyways :) Love Bite is just a perfect red holo for the Holiday season! I’ll definitely use that again soon.


GLITTER GAL AUSTRALIA FLASH SALE!

Till Christmas Glitter Gal Australia is going to be having flash sales every week (!!) Each week there’s a range of polishes with a big discount.

WEEK 2
20. – 21. NOVEMBER 2014
-45% OFF ENTIRE COLLECTION


Coupon code: HOLYHOLO(All orders are shipped from their US warehouse)


***Both polishes were sent for review. NailVinyls were purchased by me.  I don’t benefit from clicking any of the links on this post.

Born Pretty Store stamping plate 02 review – Lace nails

18

I recently received 10 new stamping plates from Born Pretty Store and instead of showing all of them at the same time I’m going to do a design with each of them and show them one or two at a time.

I’ve been wanting to do lace style nails for a long time now and stamping plate 02 had perfect patterns for that. It looks like stamping plate 02 design has changed a bit since they sent mine to me and the exact pattern I used is no longer on the new plate. On the new design there’s still very pretty lace patterns and the new ones are actually big enough to cover your whole nail. On this older plate the pattern I used was a tiny bit too narrow to cover my whole nail so I ended up using it only on the tips and the sides of the ring finger nail.

This plate worked great for me. I’m really a beginner when it comes to stamping nail art and I’ve only done stamping a few times. I had no trouble at all with this plate. The pattern transferred perfectly to the stamper and on to the nails.


I started by doing a nude base using a coat of Sally Hansen Nail Rehab nail treatment, a coat of Glisten & Glow Stuck On Blu! base coat and a coat of Essie Sugar Daddy. I also added OPI In True Stefani Fashion to the areas where I was going to stamp so that the beautiful holo glitter pieces would sparkle through the lace pattern. I finished with HK Girl top coat and let the manicure dry.

After the mani was dry I applied IsaDora Peel Off Basecoat on my cuticles to protect them from the black stamping polish. I cut pieces of blue masking tape and placed those on to my nails to cover the areas where I didn’t want to stamp. I didn’t want all the tips to look exactly the same so I tried to place the tape pieces a little differently on each nail. After all this was done I took my XL squishy stamper and black Konad stamping polish and stamped the patterns. Then I immediately removed the tapes and peel of base coat and cleaned up the little bit of black polish that got on to my skin.

Next I took a fine nail art brush and black acrylic paint. I drew a thin line next to the pattern and filled out the tiny little gaps here and there that I missed with my stamper (cos I’m simply not good enough at this yet :D ). I added the details on the ring finger between the stamping and let everything dry well again. After a while I added HK Girl top coat and rhinestones (also from Born Pretty Store) and I was done.


I absolutely love how these turned out. I’ll definitely be doing similar nails again and maybe a matching makeup look :)

You can buy the newly designed stamping plate 02 from Born Pretty Store and they also have a wide range of other nail art supplies. Born Pretty Store offers free worldwide shipping. Please use the code “NZL91” when you order and get extra -10% discount.


www.bornprettystore.com


***This stamping plate was sent for review. Rhinestones were gifted to me. Essie Sugar Daddy, Konad polish and black acrylic paint were purchased by me. I don’t benefit from clicking any of the links on this post.

ScraPerfect Best Glue Ever and Watercolor nails with foil

13

Happy Sunday! I haven’t used nail foils for a long time cos I’ve always felt like they are hard to use. They don’t stick, they wrinkle, glue doesn’t dry, glue dries too fast and so on. I got this bottle of ScraPerfect Best Glue Ever a while ago and I finally decided to be brave enough to try foil again. I used it on parts of the nails and I think it ended up looking great. So today I’m going to share my experience with ScraPerfect Best Glue Ever with you.

(more…)

Matching Nails & Makeup – Cadillacquer The Rest Is Silence

16

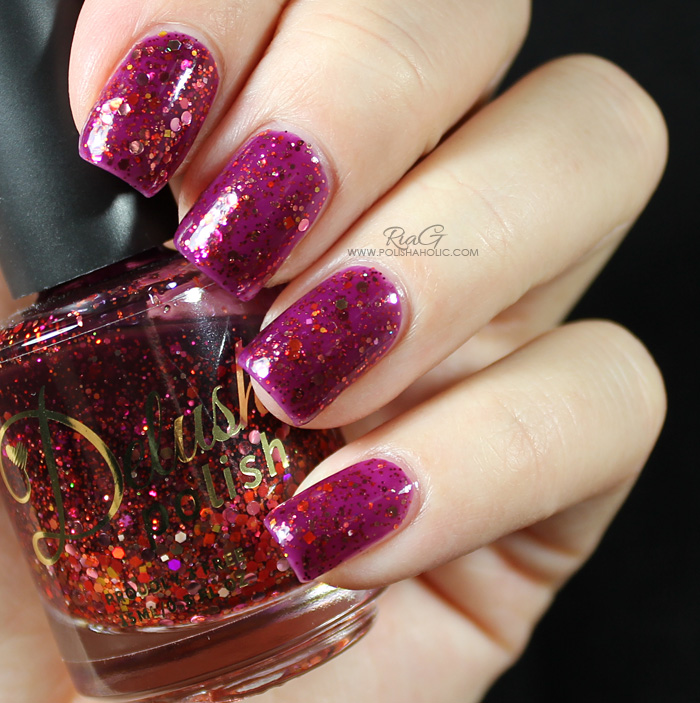
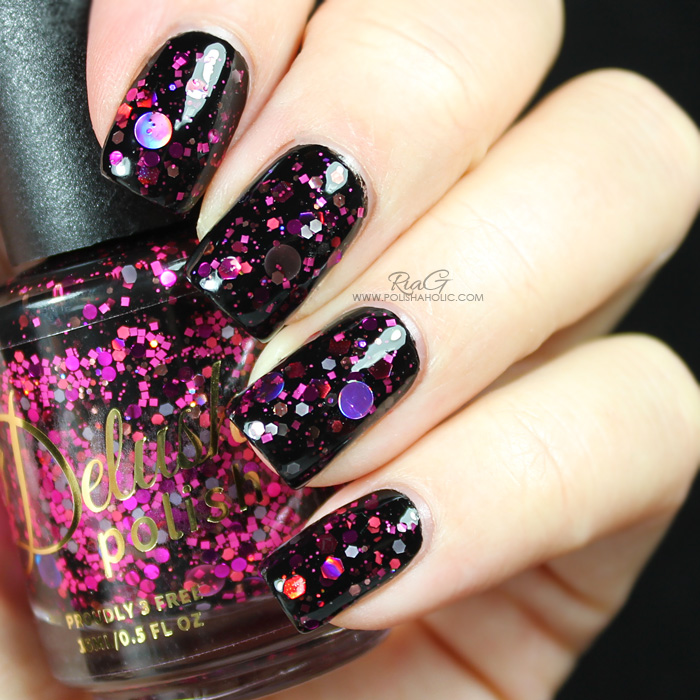
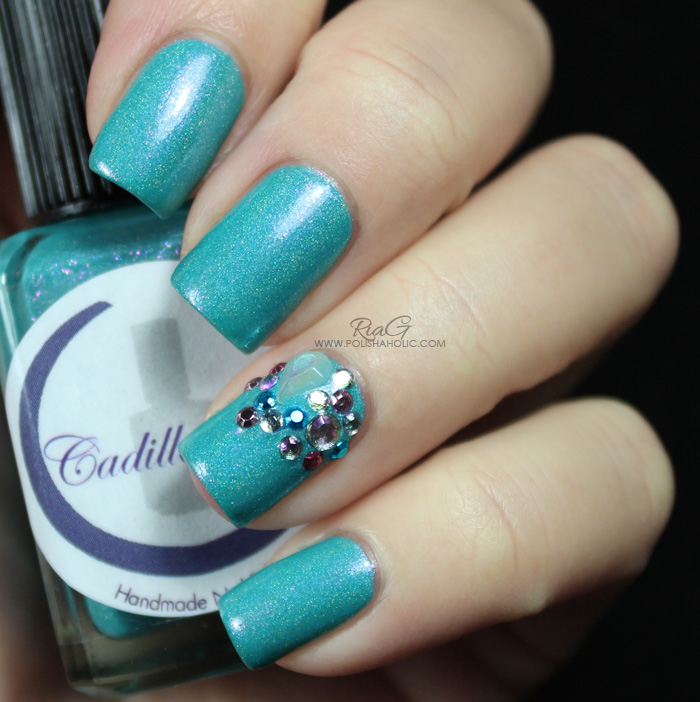
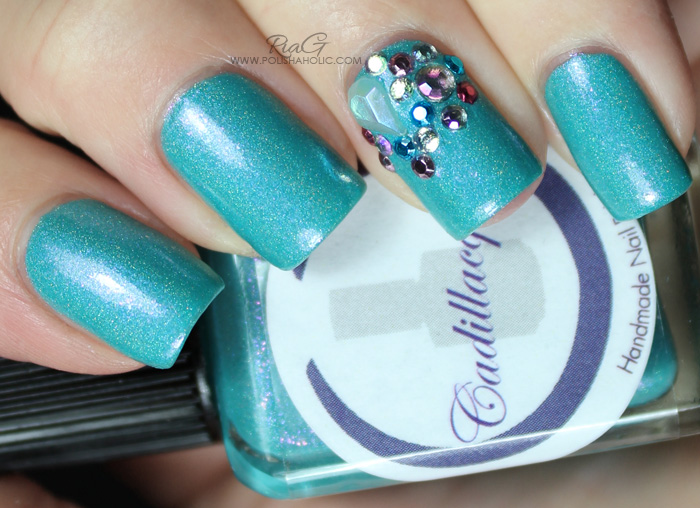
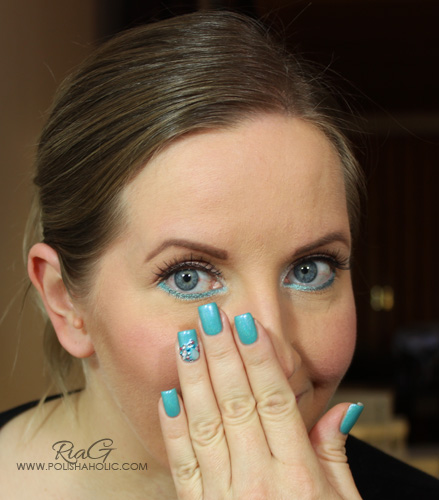
I recently placed my first Cadillacquer order and here’s the first one of the two polishes I bought, The Rest Is Silence from the Sons of Anarchy Collection. I know I just did a “Matching Nails & Makeup” post but the opportunity to use turquoise on my makeup was too good to pass so here goes another makeup post :D

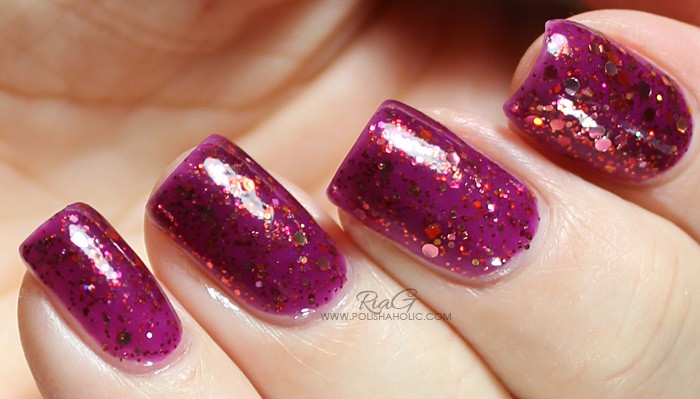
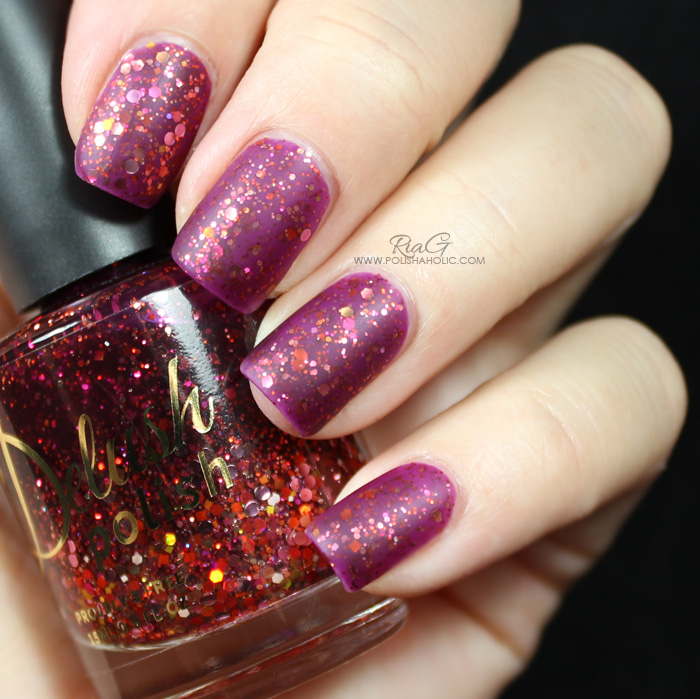
The Rest Is Silence is a GORGEOUS light turquoise polish with a subtle holo effect and pink shimmer. I can’t even… this polish is so so stunning!

Formula was excellent. Two easy coats for an opaque result. Dry time was normal and removal was easy. No staining the nails and no chipping during the three days I wore this manicure. This Cadillacquer beauty lived up to it’s good reputation and my first experience with this brand was a really positive one.

For this manicure I used a coat of Sally Hansen Nail Rehab and a coat of Glisten & Glow Stuck On Blu!, two coats of The Rest Is Silence and HK Girl top coat. For the ring finger nails I placed some studs (no longer available or at least I couldn’t find a link for you. I bought those sometime last year), waterdrops and rhinestones. All of them are from Born Pretty Store and you can use the code NZL91 for -10% off your order.


Yep, I told you, stunning polish!
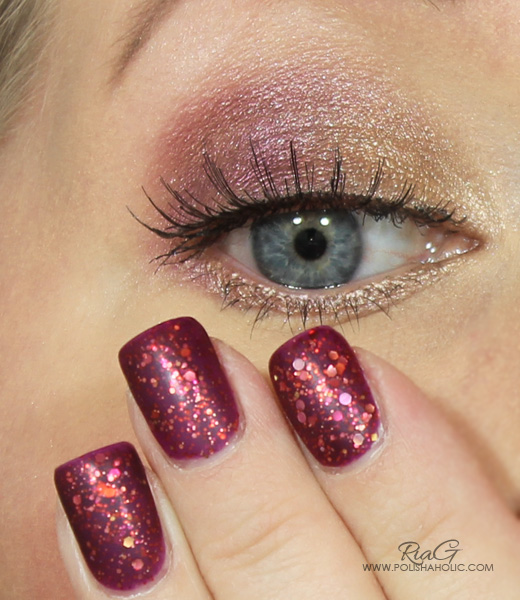
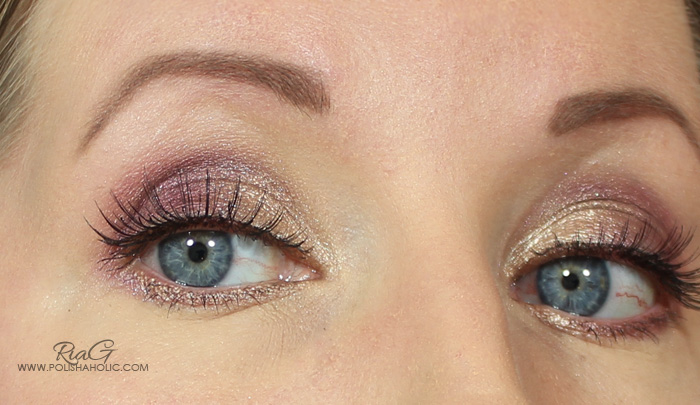
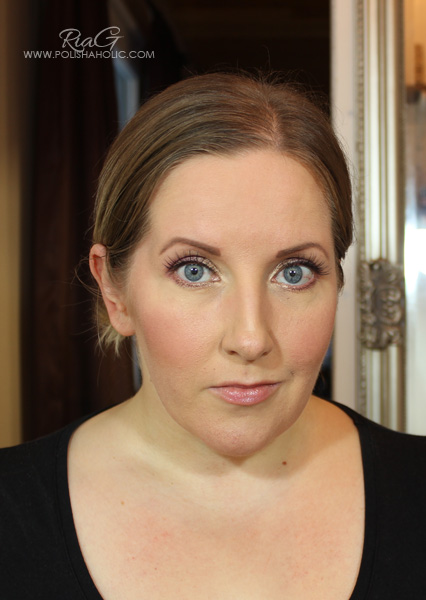
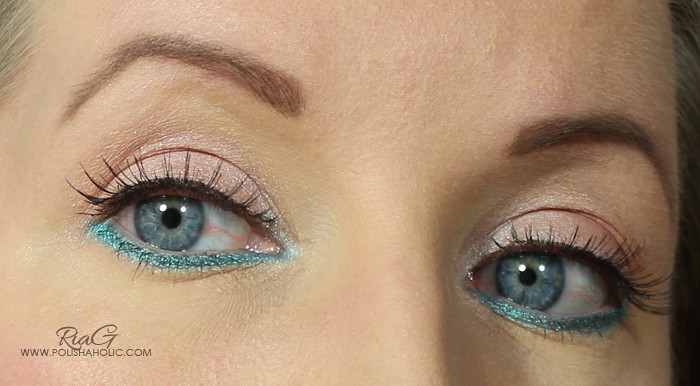
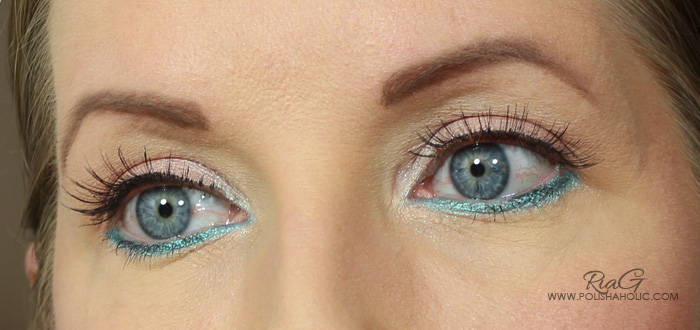
And then on to the makeup look. I didn’t want to go all crazy with the turquoise so I decided to just use it on my lower lid and leave the upper lid neutral with big lashes.
For this look I used:
Upper lid
UDPP for a base
Urban Decay Burnout, Buzz and Strange (Naked 3 palette)
False eyelashes
Lower lid
GOSH Waterproof Eye Liner Pencil in Cool Mint
Urban Decay Deep End (Fun palette)
Sugarpill Loose Eyeshadow in Lumi
I really liked how this looked. Neutral enough for every day use but still had enough color to make it look fun and fresh :) This is a very quick and easy look to create and you can use pretty much any color on your lower lid as long as it looks good on you.
***The Rest Is Silence and makeup products used on this post were purchased by me. Studs were purchased by me. Waterdrops and rhinestones were gifted to me. I don’t benefit from clicking any of the links on this post.

Fall inspired manicure and great news for Glitter Gal fans!

13

Happy hump day! For me it’s not so happy since I’m having my wisdom tooth pulled later today :/ But for the rest of you I have a pretty manicure to show (even if I say so myself) and news about Glitter Gal Australia flash sale :)

So let’s start with the manicure. For this manicure I used:

Index and pinky: a coat of Sally Hansen Nail Rehab and two coats of OPI Jinx Liquid Sand.

Middle and ring finger: a coat of Sally Hansen Nail Rehab, a coat of Glisten & Glow Stuck On Blu!, two coats of Glitter Gal creme Nuddy Nude and HK Girl top coat.

For stamping I used XL plate O, gold Konad special polish and Mavala 106 Orange Fusion from their summer 2014 collection.


GLITTER GAL AUSTRALIA IS HAVING A SERIES OF FLASH SALES!!

Till Christmas Glitter Gal Australia is going to be having flash sales every week (!!) Each week there’s a range of polishes with a big discount.

WEEK 1
13. – 14. NOVEMBER 2014
-40% OFF NEW CREME RANGE
(All orders are shipped from their US warehouse)

That’s a good one if you ask me :) I love the quality of Glitter Gal creme polishes and these colors look pretty delicious. So happy shopping and keep your eyes peeled for the next weeks offer!!


***Nuddy Nude and Orange Fusion were sent for review. Jinx, XL O stamping plate and Konad stamping polish were purchased by me.  I don’t benefit from clicking any of the links on this post.

Jindie Nails manicure

6

For this manicure I used two Jindie Nails polishes Phone, Keys, Polish, Check! and Frank’s Ole Lady. Since they were both so gorgeous I couldn’t decide which one to use first so I used both. I have a review and better swatch photos of Phone, Keys, Polish, Check! coming up later on :)

For this manicure I used Sally Hansen Nail Rehab treatment and Glisten & Glow Stuck On Blu! base coat on all the nails. Phone, Keys, Polish, Check! on my index, middle and pinky nail. Then I used Frank’s Ole Lady for thumb and ring finger nails. Stamping was done with Konad silver stamping polish and Konad M63 plate. I finished the manicure with HK Girl top coat.

If you want Frank’s Ole Lady I suggest you act FAST. Right now, at this moment there’s only 3 left on the store and it’s not coming back!

You can buy Jindie Nails polishes from JindieNails.com or from authorized distributors. You can find the latest news, releases and restock info from their FB and IG.


***Phone, Keys, Polish, Check! was sent for review. Frank’s Ole Lady was purchased by me.  I don’t benefit from clicking any of the links on this post.

Matching Nails & Makeup – Delush Polish Time To Kill

20

Today I’m trying something that is new to my blog. I take a polish/manicure and match my makeup with it to show you guys. Most of these looks are meant to be your average every day look. Something I can wear when I walk out the door to go shopping or just go to a grocery store. I like to play with colors too so there is going to be everything from nude makeup to a smokey eye. Needless to say, I have a lot of makeup and nail polish to match so I shouldn’t run out of material anytime soon :D It’s just a matter of having the time to do my makeup and take photos too. So when ever I have time to do this, you’ll see the results.

So my choice for today’s makeup look was based on Delush Polish Time To Kill from the Slice Of Life Collection. This is a stunning plum jelly that can be worn on it’s own or over a base color. The formula is flawless. It applies nice and thin. Glitters spread evenly without having to place or dab them on. Dry time is also pretty fast. It’s just perfect!

For this manicure I used a coat of Sally Hansen Nail Rehab treatment, a coat of Glisten & Glow Stuck On Blu! base coat, a coat of Essie Sugar Daddy, two coats of Time To Kill and HK Girl top coat. I also added a matte top coat (This matte top coat is from Born Pretty Store and I’ll have a review coming up for it later on. You can use the code NZL91 for -10% off your order).


Gorgeous! Right?

So it was easy to create a makeup look for this manicure. I used purple, plum and gold eyeshadows this time but orange would also go great with this if you want a bolder, more colorful look that really makes blue eye color pop. For the eye makeup I used Sleek Make Up Vintage Romance palette. I really like this  palette. The colors are perfect for fall and it’s also good quality for an affordable price. I really need to get more of these :)


For this look I used gold Meet in Madrid and the three purple shades from the left side of the bottom row. These look quite shiny on the lid so I tried not to blend the shadows too high up. I have a lot of area to cover on my lids and if I’m not careful the makeup can end up making me look like a clown.I added false lashes cos the last pregnancy totally messed up my lashes and I have like half of them left and they are much shorter than usual. Hopefully they’ll return to normal soon enough. Till then I’ll be faking it ;)
 This look is pretty subtle and natural with a hint of color on the eyes. Good every day look that could  easily be turned into a darker nighttime look by adding dark eyeliner and creamy eyeshadow as a base to make the eyeshadows more visible.

I hope you liked this post and the idea of matching nails with makeup. I really enjoyed doing a makeup post. It’s been so long since the last one. This was fun for me at least :D


***Time To Kill was sent for review. Matte top coat was gifted to me. All the makeup products were purchased by me. I don’t benefit from clicking any of the links on this post.